tutorial
How to Organize Photos with Star Ratings and Color Labels in SnapCuller
overview
Beyond flags: ratings and labels
In a previous tutorial, we covered how to use flag keys for a fast binary cull: keep or reject. Flags are perfect for the initial pass, but once you have a pile of Picked photos, you need a way to differentiate between "good enough for the client gallery" and "portfolio-worthy hero shot."
That is where star ratings and color labels come in. These two systems work together to give you fine-grained control over both the quality and the status of every photo in your shoot.
This tutorial covers everything from keyboard shortcuts to real-world workflows, including how to combine ratings, labels, and filters to manage even the largest shoots with confidence.
Measure quality. A 1-to-5 scale that ranks how good each photo is. Use them to tier your keepers into delivery grades.
Track status. Five colors that represent whatever meaning you assign: editing progress, scene type, delivery destination, or creative treatment.
star ratings
Ranking your photos with stars
Star ratings use a 1-to-5 scale. Each level represents a tier of quality. Unlike flags, which force a binary decision, ratings let you express degrees of preference across your entire set.
The keyboard shortcuts
Every rating level is mapped to a keyboard shortcut using the Alt key (or Option on Mac) combined with a number:
Reject-tier. Barely acceptable.
Below average. Backup only.
Standard delivery quality.
Exceptional. Blog or social highlight.
Hero shot. Portfolio or print worthy.
Removes the rating entirely.
💡 Mac Users: The shortcuts use Option instead of Alt. For example, Option + 3 assigns a 3-star rating. All shortcuts can be remapped in Settings > Shortcuts.
When you assign a star rating, a badge with filled stars appears on the photo's thumbnail in both Single View and Grid View. The badge is always visible so you can scan your selections at a glance.
A suggested tier system
There is no universal standard for what each star level should mean. The key is to establish a consistent system and stick to it across all your projects. Here is a tier system used by many professional photographers:
| Rating | Meaning | Example Use |
|---|---|---|
| ★ | Barely acceptable | Backup if a better frame does not exist |
| ★★ | Below average | Secondary filler for an album |
| ★★★ | Standard delivery | Client gallery, online album |
| ★★★★ | Exceptional | Blog feature, social media highlight |
| ★★★★★ | Hero shot | Portfolio piece, wall print, competition entry |
You do not have to use all five levels. Some photographers prefer a simpler three-tier system: 3 stars for client delivery, 4 stars for highlights, and 5 stars for portfolio. Choose the granularity that matches your needs.
color labels
Tracking status with color labels
Color labels serve a different purpose than star ratings. While stars measure quality, colors track status. A photo can be simultaneously rated 5 stars (exceptional quality) and labeled Red (needs retouching). The two systems are completely independent and designed to be used together.
The five colors and their shortcuts
SnapCuller supports five color labels. Each one is assigned to a keyboard shortcut using Alt (or Option on Mac) combined with a number key:
Needs heavy retouching. Skin cleanup, object removal, sky replacement, or complex compositing work that requires dedicated time in Photoshop.
Awaiting review. The photo needs a second opinion — from a client, lead editor, or creative director — before being approved for delivery.
Ready to deliver. Editing is complete, exports are finalized, and the image is cleared for delivery to the client or publication.
Creative treatment planned. The photo is earmarked for special processing: black and white conversion, dramatic color grading, artistic crop, or a composite.
Personal use. Great for marking images intended for your own portfolio, Instagram, personal blog, or behind-the-scenes content.
To remove a color label, press Alt + Backspace. The label badge disappears and the photo returns to an unlabeled state.
💡 Important: The color meanings listed above are suggestions, not rules. The power of color labels is that you define what each color means for your workflow. A wedding photographer might use Red for "Ceremony," Yellow for "Reception," and Green for "Portraits." An event photographer might use colors to separate different speakers or sessions. Choose a system and stay consistent.
Color label badges appear on the photo thumbnail as a small colored dot with a text label. They are visible in both Single View (next to the flag and rating badges) and in Grid View, where they provide instant visual scanning across hundreds of thumbnails.
the workflow
Step by step: the complete rating and labeling workflow
1. Start with flags (the rough cut)
Before applying any ratings or labels, complete your initial cull using flag keys. Press P to pick, X to reject, and U to unflag. This binary pass removes technical failures and leaves you with a clean set of keepers. If you need a refresher, see the flag key tutorial.
🔥 Why flags first? Flags reduce your working set. If you start with 2,000 photos and reject 800 in the first pass, your rating pass only needs to evaluate 1,200 images. This saves significant time and reduces decision fatigue.
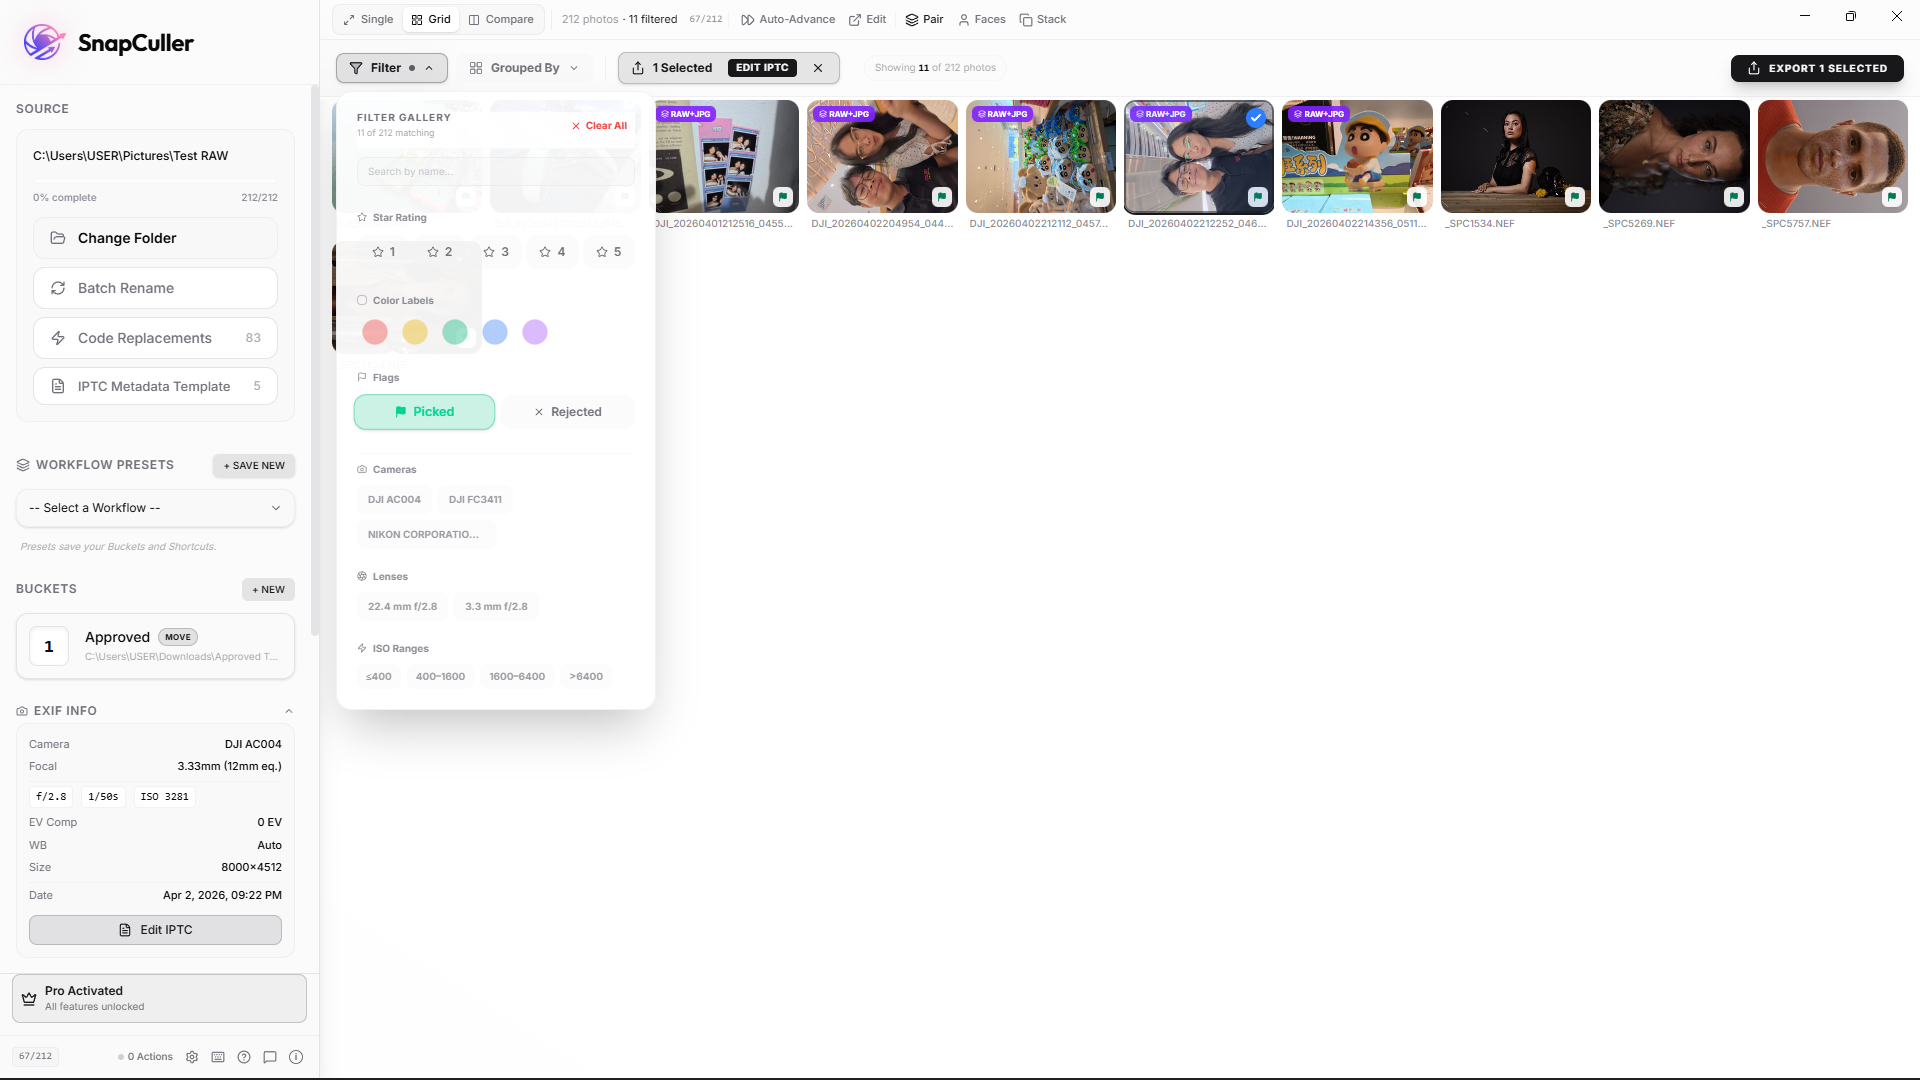
2. Filter to Picked photos only
Open the filter panel in the sidebar or the Grid Header. Under the Flags section, select Picked. This hides all rejected and unflagged photos, leaving only your approved selections visible. Now you are working exclusively with photos that have already passed the quality bar.
3. Rating pass: tier your keepers
Navigate through your Picked photos in Single View. For each image, assign a star rating based on its quality and intended use:
- 3 Stars (Alt + 3): Good enough for the standard client gallery.
- 4 Stars (Alt + 4): Exceptional composition, lighting, or moment. Worth featuring on your blog or social media.
- 5 Stars (Alt + 5): The absolute best. Portfolio-grade hero shots you would put on a wall print or a competition entry.
Skip photos that you consider average — they will remain unrated and default to the standard delivery tier. You can always go back and refine ratings later.
💡 Workflow Tip: Enable Auto-Advance in the header bar. SnapCuller automatically moves to the next photo 150ms after you press a rating shortcut. This keeps you in a flow state and eliminates the need to press the arrow key after every decision.
4. Label pass: assign statuses
Now that your photos are tiered by quality, make a third pass to assign color labels based on their current status. This pass is especially valuable for collaborative workflows where multiple people are involved:
- Red (Alt + 6): "This needs retouching before delivery."
- Yellow (Alt + 7): "Waiting for client approval."
- Green (Alt + 8): "Done. Ready for export."
- Blue (Alt + 9): "Earmarked for creative treatment."
As you progress through editing, update the labels. A photo that was Red (needs retouching) can be changed to Green (ready for delivery) once the retouching work is complete.
5. Filter, review, and export
Switch to Grid View by pressing G. Open the filter panel and combine rating and label filters to isolate exactly what you need:
- Filter by 4+ Stars + Green label: to see only your exceptional, delivery-ready images.
- Filter by Red label: to see your retouching queue.
- Filter by Yellow label: to see everything waiting on client feedback.
- Filter by 5 Stars only: to isolate your portfolio-tier images for a final hero pass.
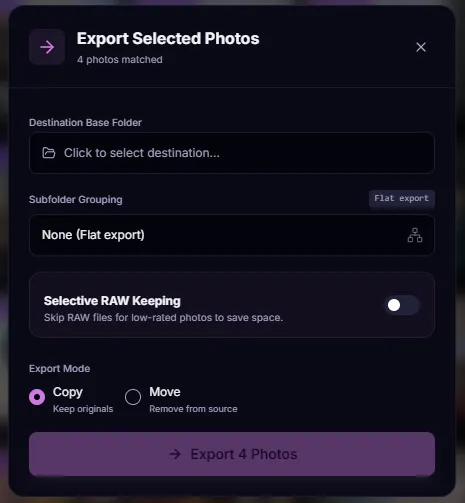
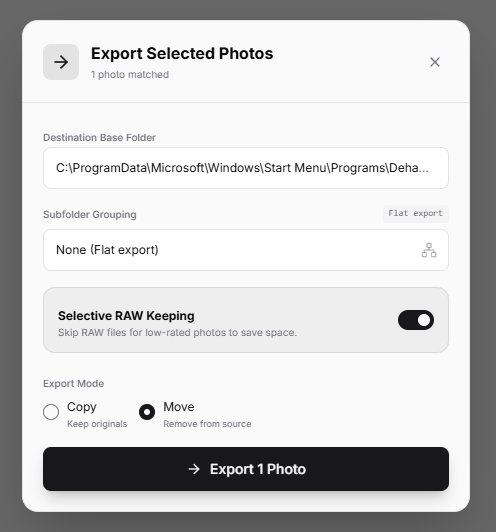
Once you have the right photos filtered, select all (Ctrl+A / Cmd+A) and press the export button (Ctrl+Shift+E / Cmd+Shift+E) to copy or move them to your destination folder.
real-world scenarios
Practical workflow examples
Wedding photography
Weddings generate thousands of images across multiple scenes. Here is how a professional might combine all three systems:
- Pass 1 — Flags: Reject blurry, overexposed, or duplicate photos. Pick everything usable.
- Pass 2 — Ratings: Rate picked photos from 3 to 5 stars based on emotional impact, sharpness, and storytelling.
- Pass 3 — Labels by scene: Red for Preparation, Yellow for Ceremony, Green for Reception, Blue for Portraits, Purple for Detail Shots.
- Export: Filter to "4+ stars + Green label" to export the best reception images for the client's sneak peek.
Product photography
Product shoots have a clear status pipeline. Color labels map naturally to the production stages:
- Red: Needs background removal or composite work.
- Yellow: Sent for internal review.
- Green: Approved and ready for the website.
- Blue: Hero angle for marketing materials.
- Ratings: 3 stars for web catalog, 4 stars for social media, 5 stars for hero banner placement.
Event photography
When covering a multi-day conference or corporate event, use colors to separate sessions and ratings to tier quality:
- Labels: One color per keynote speaker, panel, or breakout session.
- Ratings: 3 stars for standard event coverage, 5 stars for the hero moments that will appear in the event recap.
- Filter: After the event, filter by color to quickly deliver scene-specific galleries to each department.
compare mode
Using Compare View for tough decisions
Sometimes two or more photos from the same moment are so close in quality that assigning different ratings feels arbitrary. This is where Compare View becomes essential.
Press C to enter Compare View, which displays up to 4 images side by side with synchronized zoom. Pan and zoom into the eyes or the main subject to compare sharpness at 100%. Once you identify the sharpest frame, assign it a higher star rating and move on.
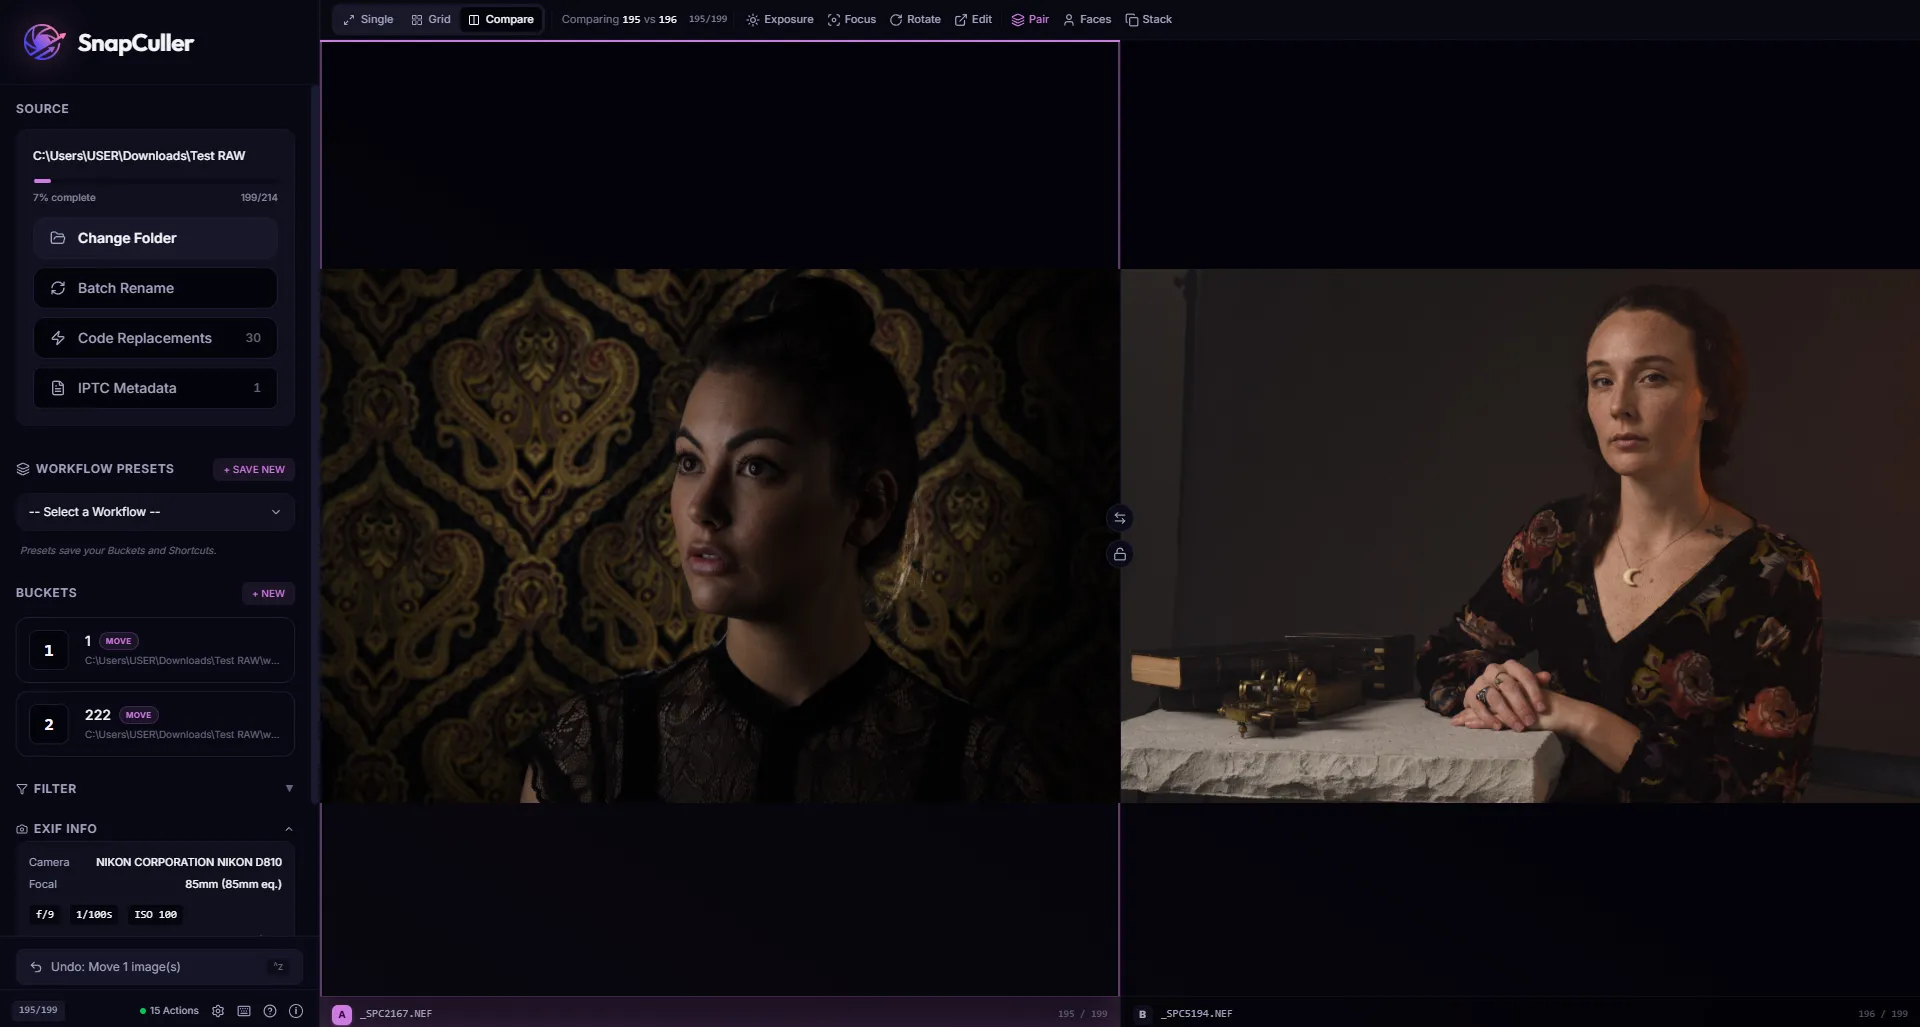
💡 Pro Tip: Use Focus Peaking before entering Compare View. The peaking overlay highlights the sharpest edges with a colored outline, letting you pre-filter soft images before committing to a detailed side-by-side comparison.
advanced
Combining filters for precision
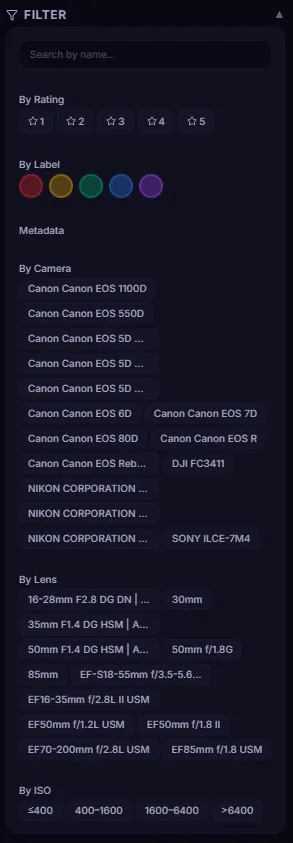
The real power of SnapCuller's rating and label system emerges when you combine multiple filters simultaneously. The filter panel in the sidebar supports multi-select for both ratings and labels:
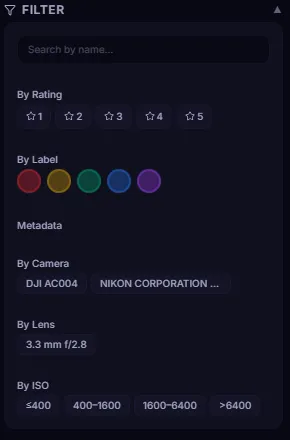
- Multiple ratings: Click both 4★ and 5★ to show all exceptional images.
- Multiple labels: Click Red and Yellow to see all photos that still need work.
- Combine all: Filter for "Picked + 5★ + Green label" to isolate your absolute top-tier, delivery-ready hero shots.
- Add metadata: Layer EXIF filters on top — filter by camera body, lens, or ISO range to find the 12 frames shot at f/1.4 in a 4,000-photo wedding.
Every filter combination applies instantly. There is no waiting for a catalog to recalculate or indexes to rebuild. You can toggle filters on and off in real time and see the results immediately.
selective raw
Smart storage: selective RAW keeping
If you shoot RAW+JPG, star ratings unlock an additional power feature: Selective RAW Keeping. This allows SnapCuller to intelligently manage your disk space based on the quality of each photo.
Enable this in Settings and set a rating threshold (for example, 4 stars). When you export or move photos to a bucket:
- Photos at or above the threshold: Both RAW and JPG are kept.
- Photos below the threshold: Only the JPG is kept, saving significant disk space.
For a 2,000-photo wedding where only 200 photos are 4+ stars, this can save tens of gigabytes of storage. The JPG files are still available as proof images, but you are not burdened with RAW files for images that will never need deep post-processing.
compatibility
Where are ratings and labels stored?
Just like flags, star ratings and color labels are written to .xmp sidecar files using the industry-standard Adobe XMP format. These sidecar files live in the same folder as your photos, right next to the original files.
When you open the same folder in Lightroom, Capture One, Photo Mechanic, or any other application that reads XMP metadata, your star ratings and color labels will already be applied. No export step is needed — the data transfers seamlessly.
Compatibility: Adobe Lightroom, Capture One, Photo Mechanic, ACDSee, and most professional photo management tools all read the same XMP sidecar format. Ratings (xmp:Rating), labels (xmp:Label), and flags all appear automatically.
💡 How XMP works: When you rate a photo called IMG_0042.CR3 with 4 stars, SnapCuller creates (or updates) a file called IMG_0042.CR3.xmp in the same folder. This sidecar contains all your metadata: ratings, labels, flags, and IPTC data. The original photo file is never modified.
summary
Recap
The complete SnapCuller workflow uses three complementary classification systems:
Pass 1. Binary keep or reject. Removes technical failures and reduces your working set.
Pass 2. Quality tiering from 1 to 5. Separates client gallery from portfolio hero shots.
Pass 3. Status tracking. Manages editing progress, scene organization, and delivery pipeline.
Each system serves a distinct purpose, and they all work together. Use flags for speed, ratings for quality, and labels for status. Combine them with SnapCuller's advanced filters to instantly isolate exactly the images you need — whether that is "unretouched ceremony photos rated 5 stars" or "all delivery-ready portraits."
Every rating and label is saved as XMP metadata, so your work transfers seamlessly to Lightroom, Capture One, or any other professional tool in your pipeline.