— core idea —
The SnapCuller philosophy
SnapCuller is built on one principle: zero waiting. Traditional cullers force you into an "import" database that creates friction and bloat. We work directly on your filesystem and extract embedded JPEG previews instantly, so you can start culling 10,000+ photos the second you open a folder.
Instant
Embedded previews, zero indexing
Filesystem-first
Your folders stay your folders
Non-destructive
XMP sidecars, never touch the RAW
.webp)
— chapter 1 —
Getting started
Drag & drop
Grab any folder from your file explorer and drop it anywhere into SnapCuller. That's it. No import dialog. No catalog file.
Browse manually
Use the Change Folder button in the sidebar to pick a project directory via the system picker.
Format support: RAW (CR3, ARW, NEF, RAF, ORF, …), HEIC, JPEG, TIFF. GPU-accelerated for buttery rendering.
— chapter 2 —
Interface overview
The UI is engineered for speed, every critical tool is one click or one key away.
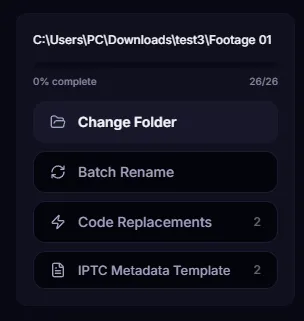
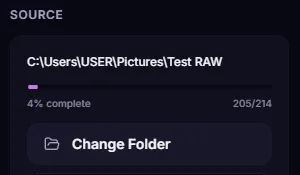
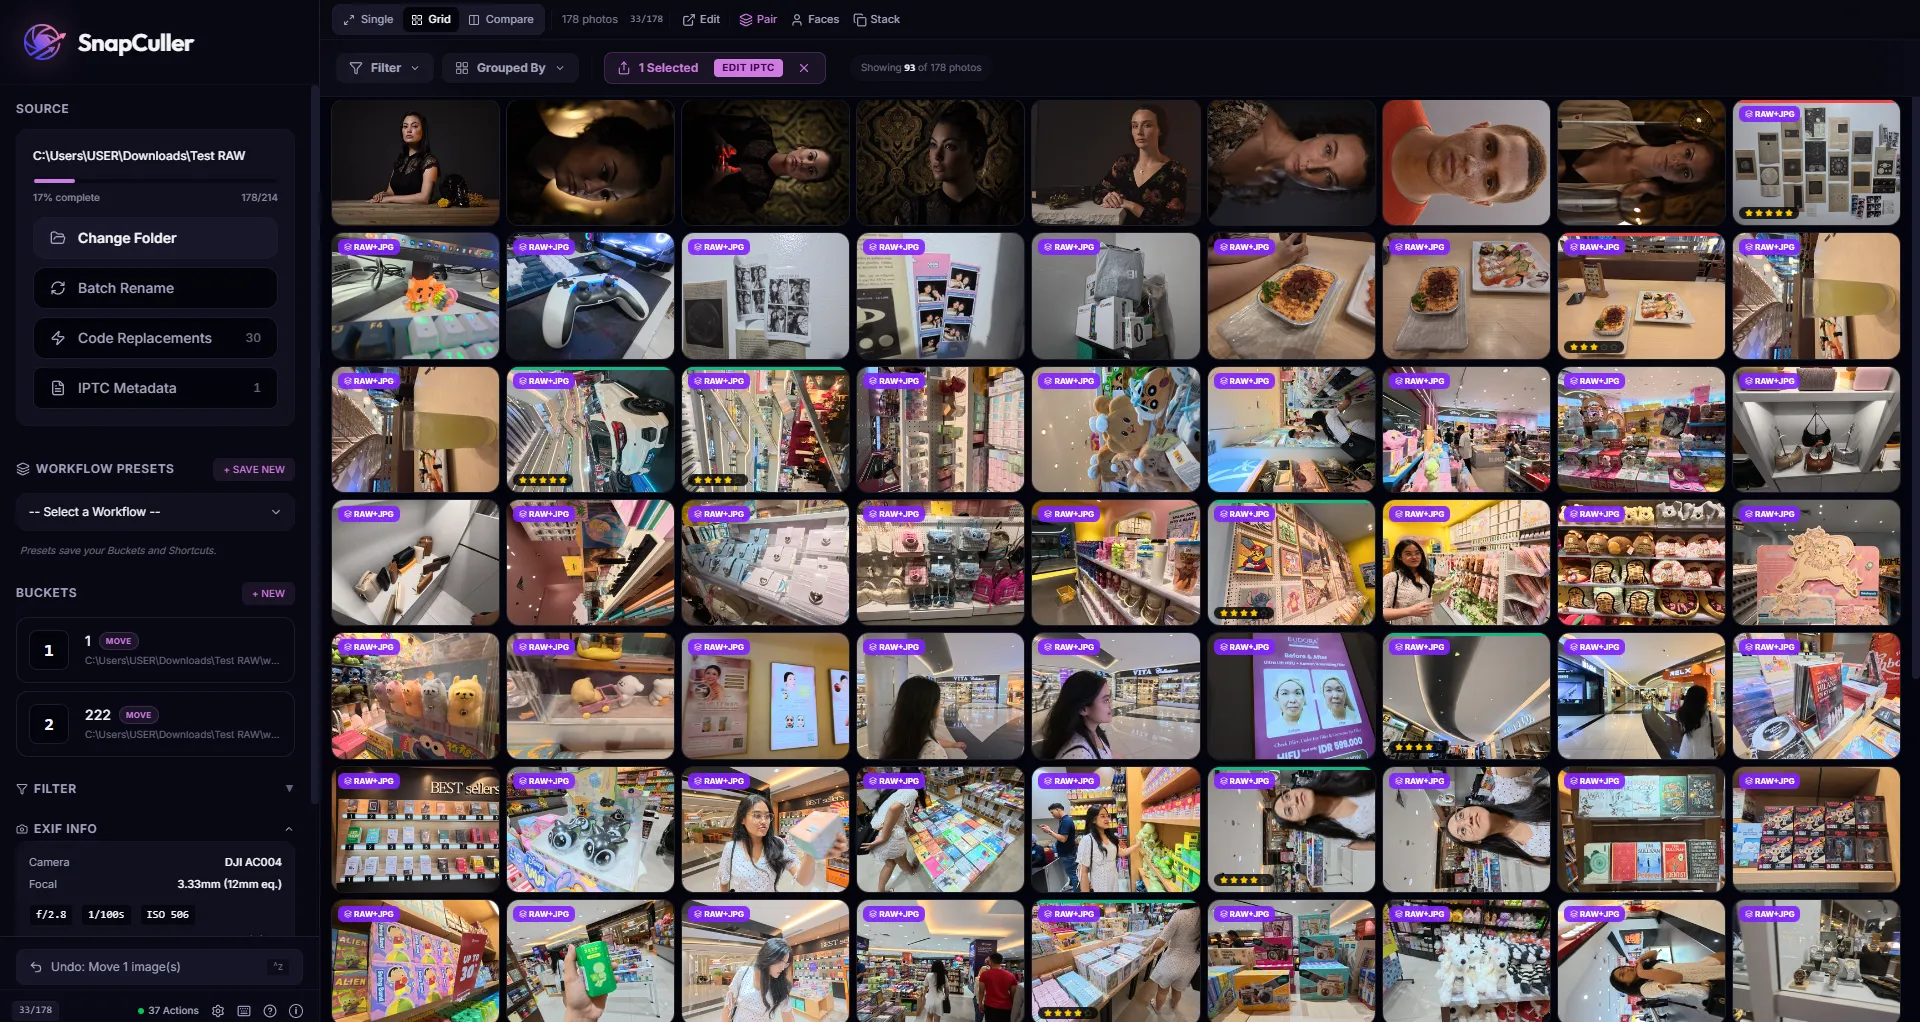
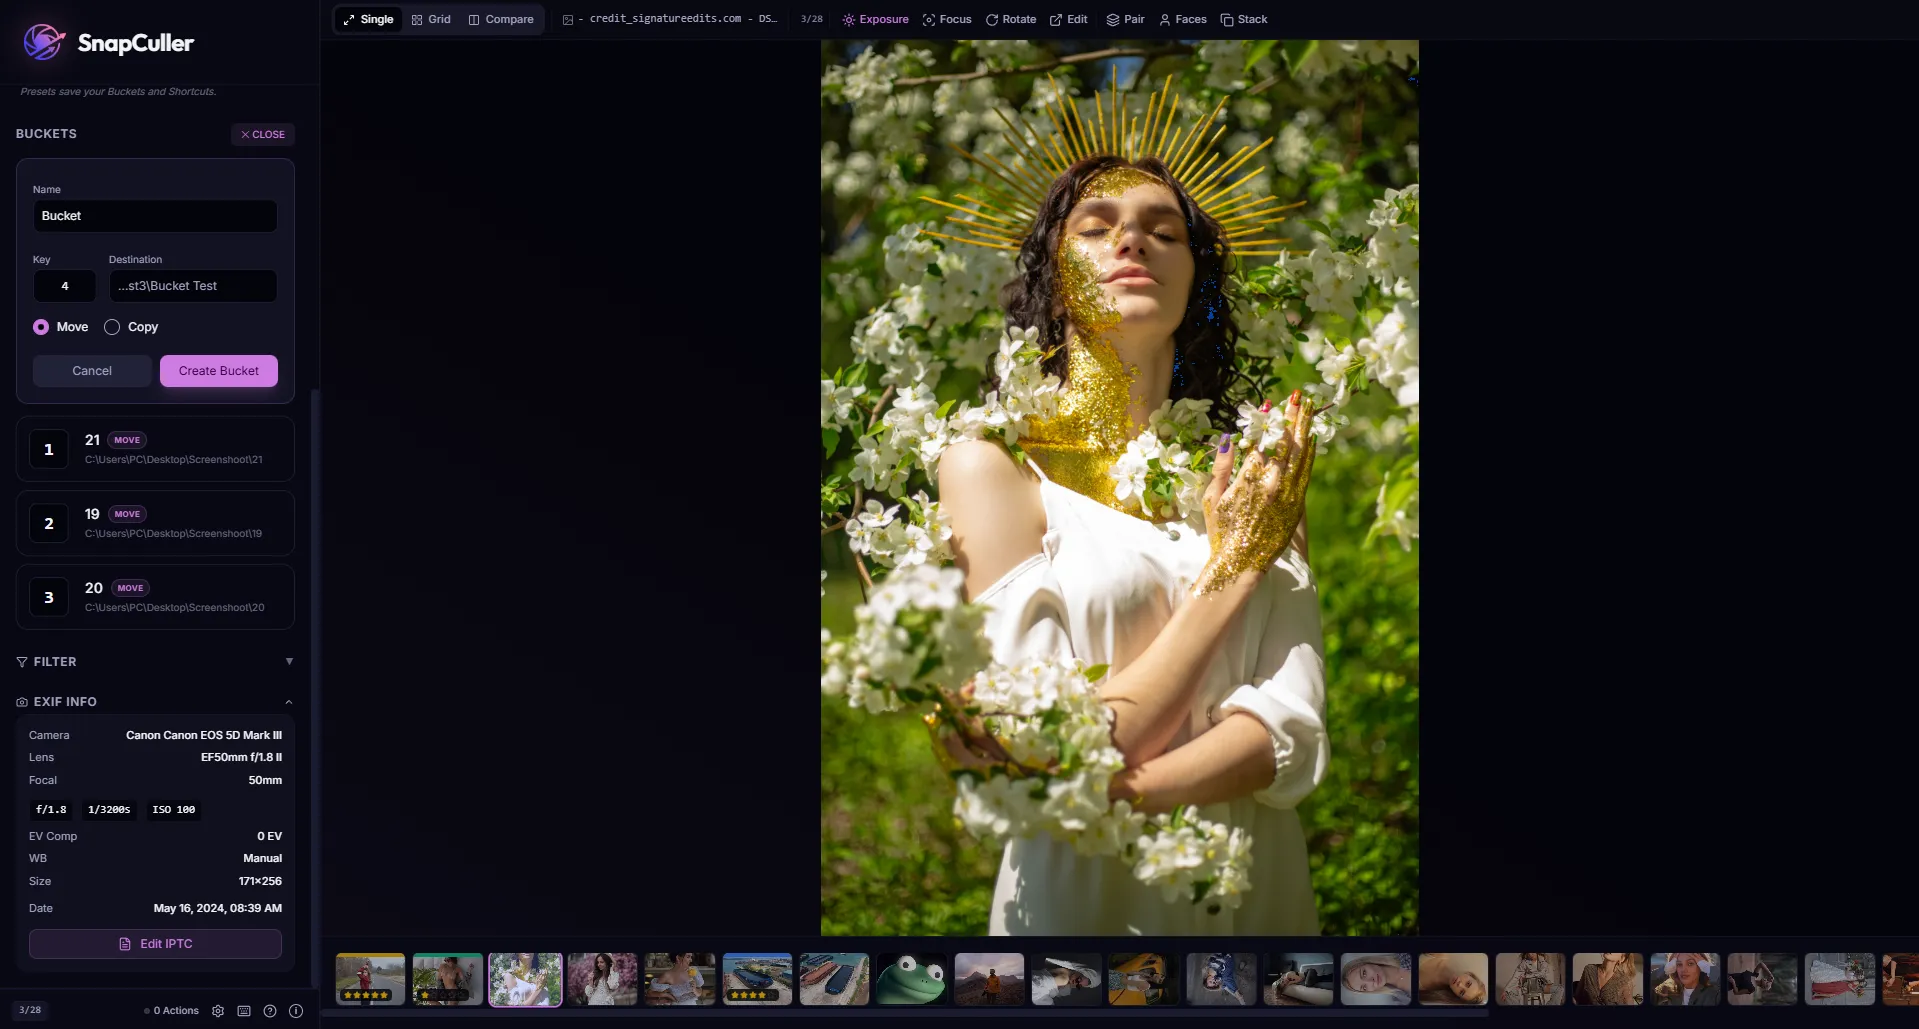
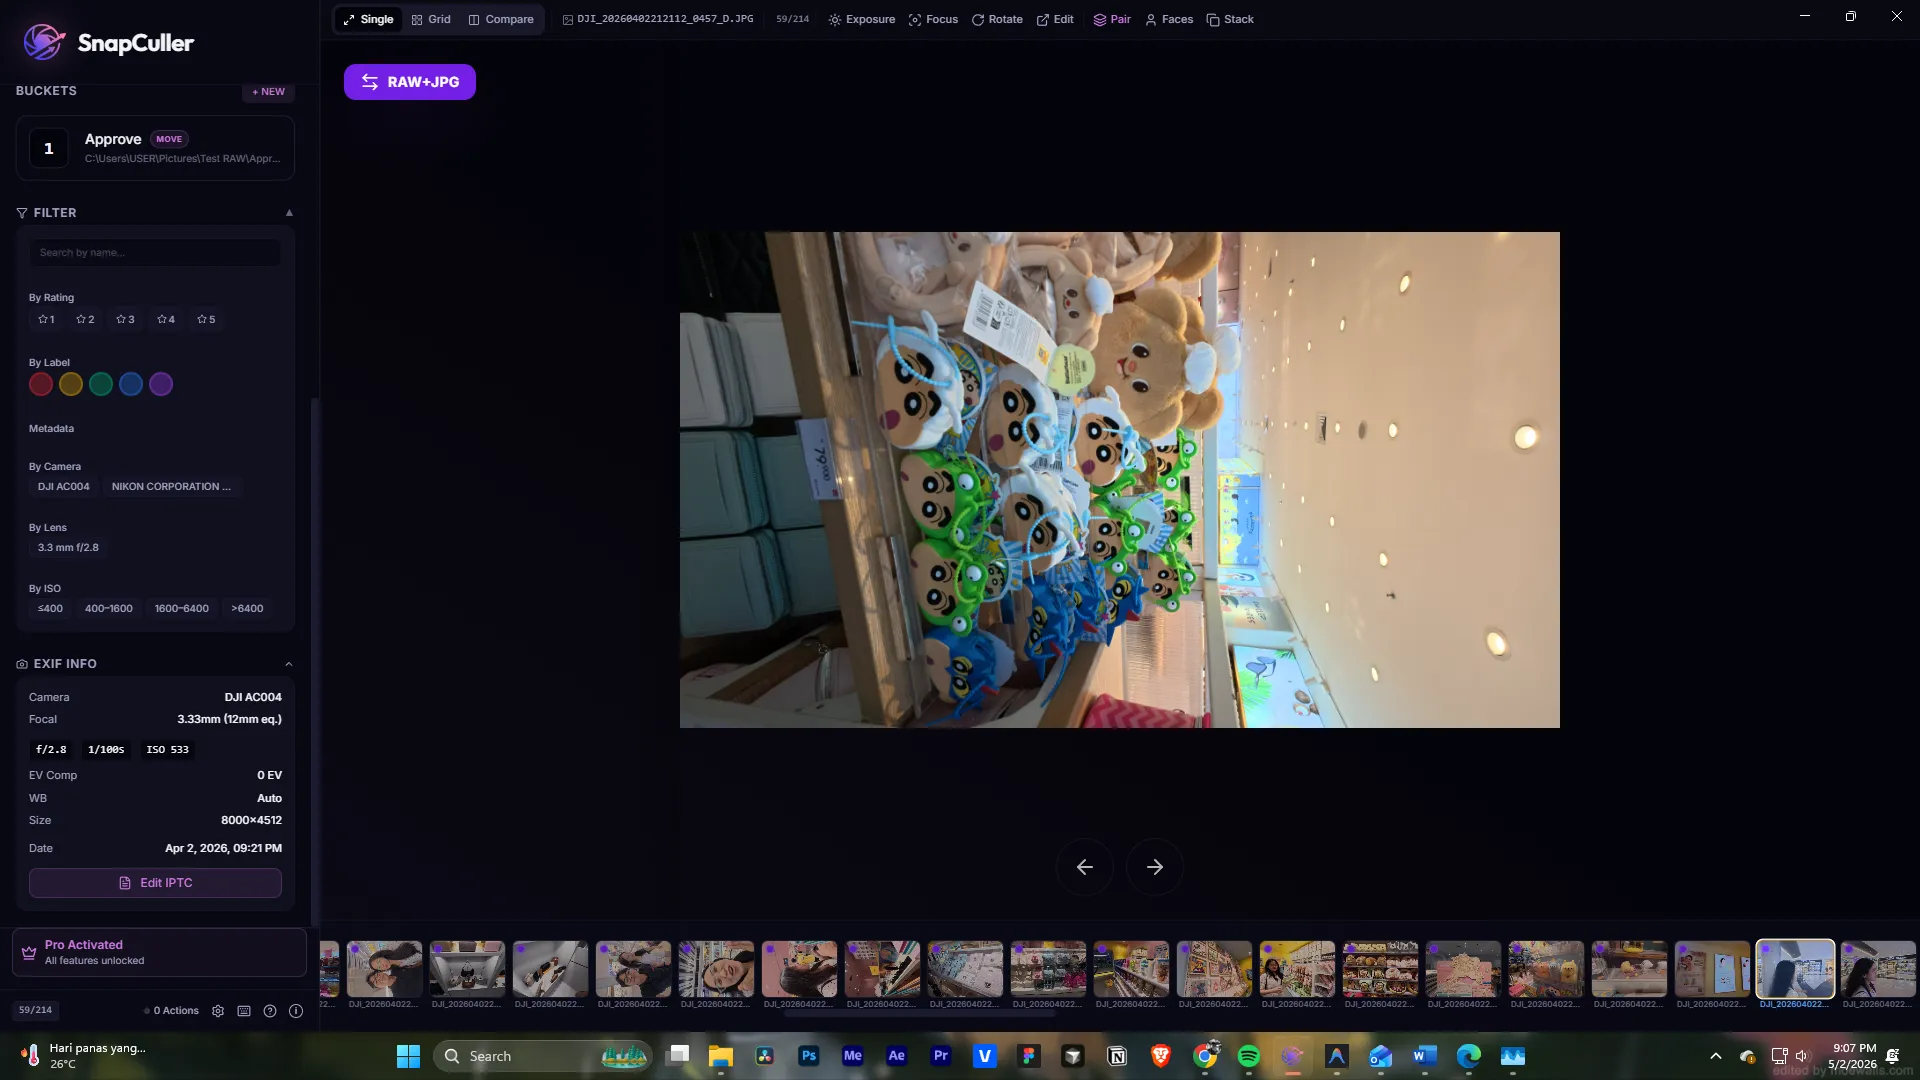
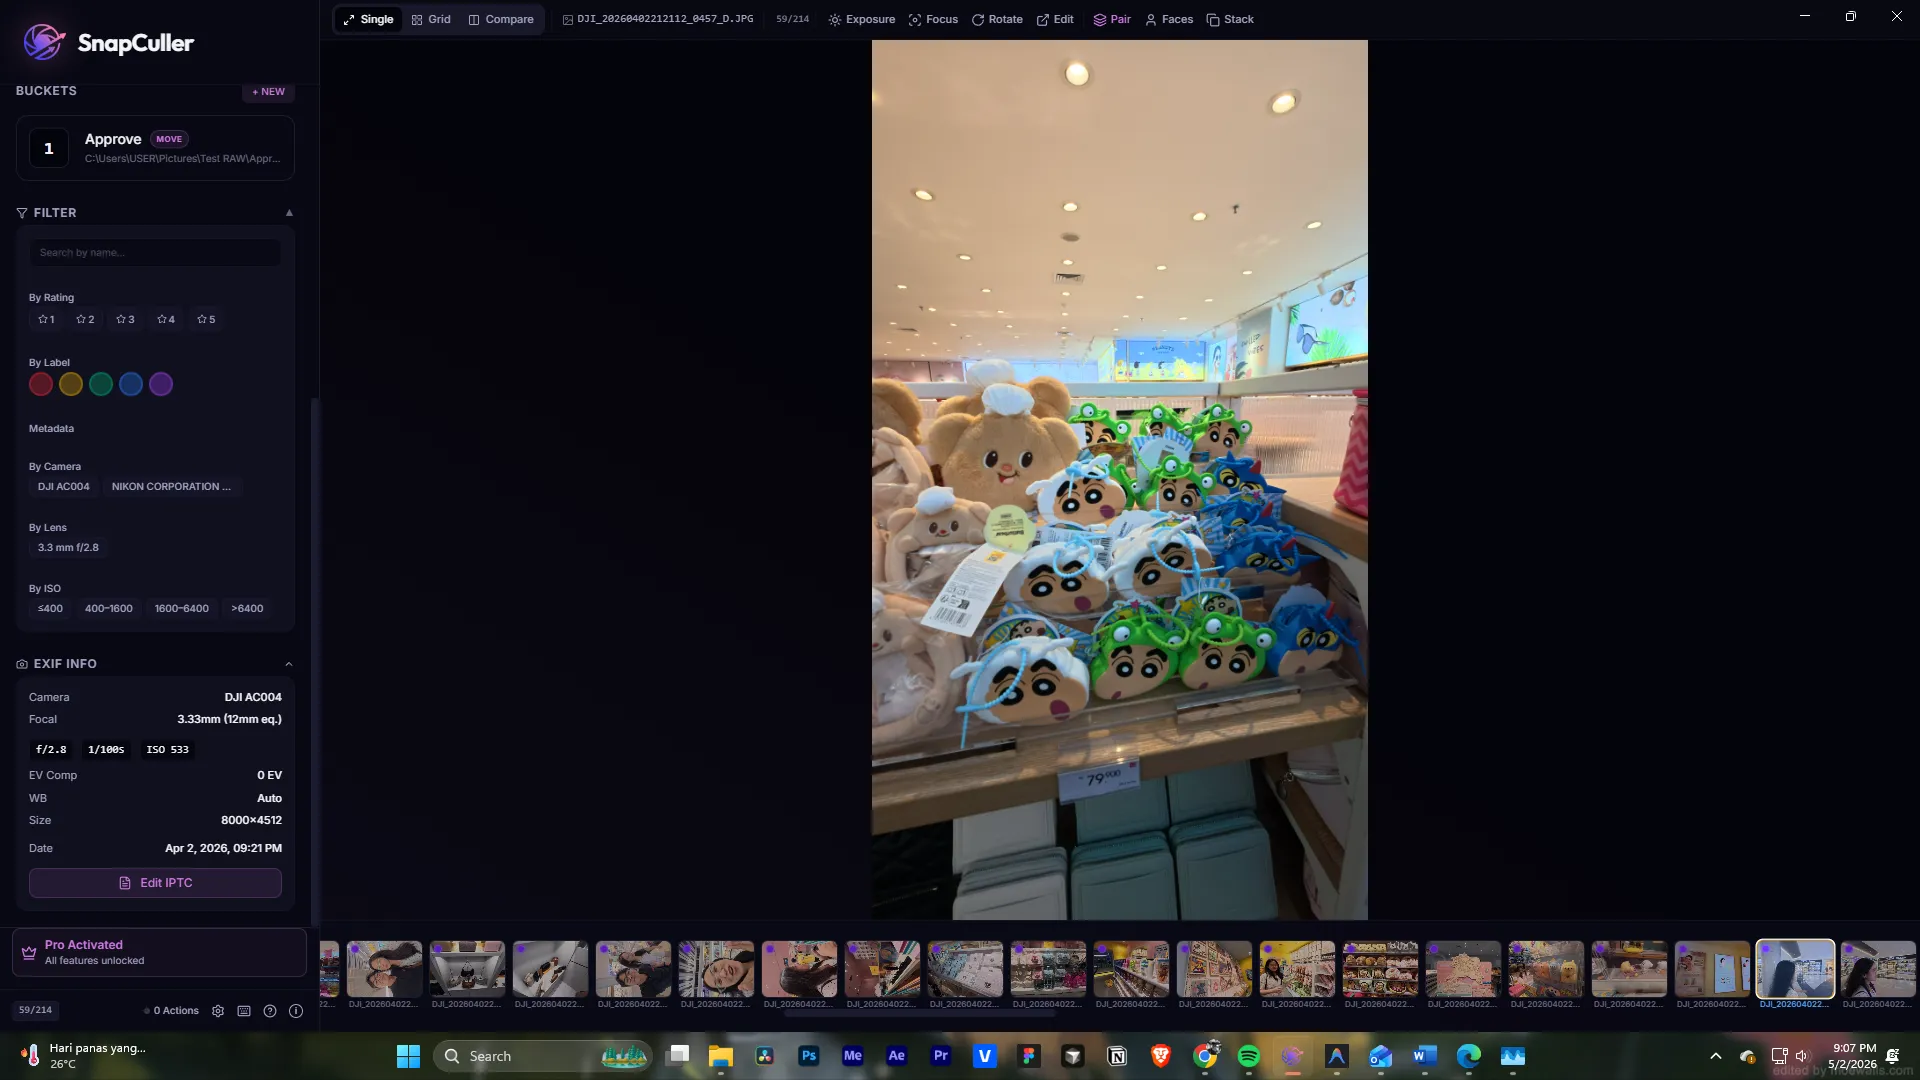
1. Sidebar
Your command center: folder management, batch rename, IPTC templates, presets, and a real-time progress bar.
.webp)
2. Filmstrip & Metadata
Bottom bar = filmstrip for rapid jumping. Side panel = live EXIF readout.
.webp)
.webp)
— chapter 3 —
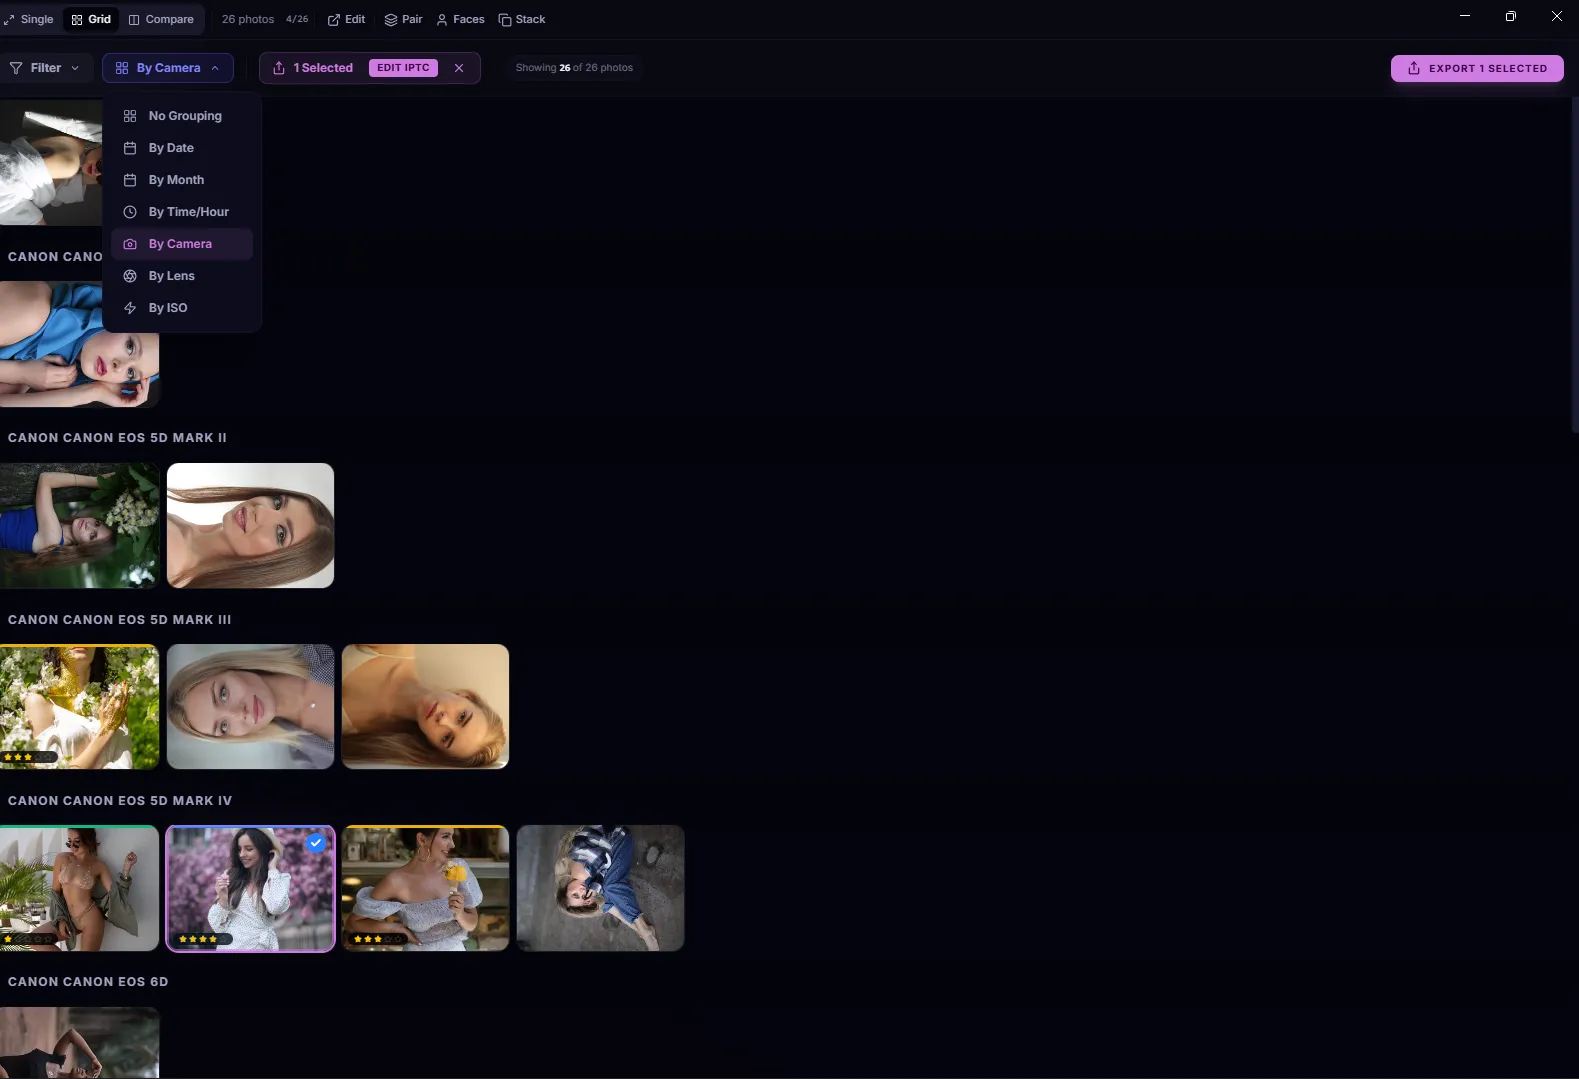
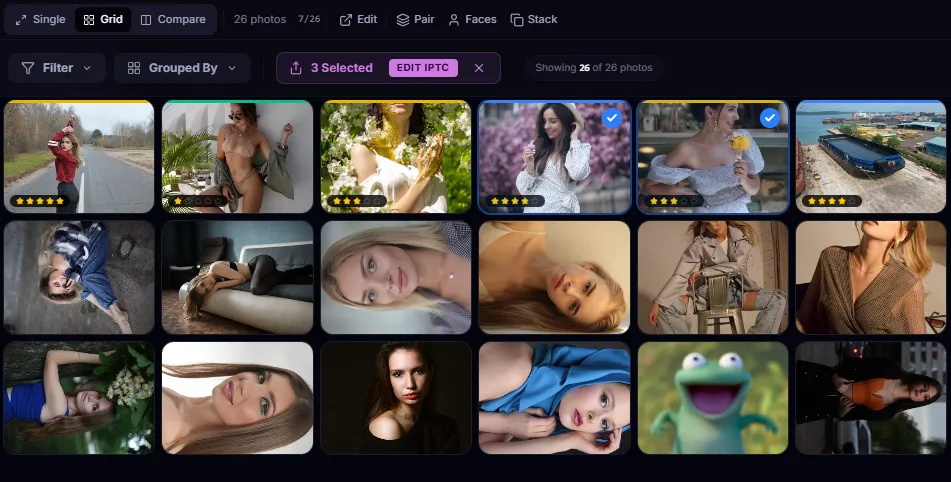
Grid view library
A bird's-eye view of the entire shoot, virtualized to render 50,000+ thumbnails without skipping a frame. Press G any time.
Grouping & sorting
Group by Date · Camera · Lens · ISO to separate ceremony from reception, body A from body B, or wide-angle from tele.
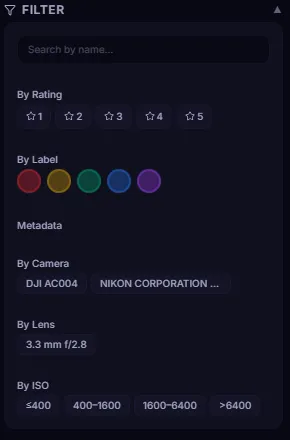
Advanced filtering
Drill down by stars, color labels, ISO range, lens model, or camera body. Find the 12 frames at f/1.4 in a 4,000-photo wedding.
RAW + JPG pairing
Treat pairs as one. Rate the JPG, the RAW follows.
Burst stacking
Auto-group rapid bursts so you cull the stack, not 14 frames.
— chapter 4 —
Review & analysis
Single view is where decisions happen. Pro analytical tools verify every keeper is technically perfect.
Exposure overlays
Press J to cycle through pro exposure overlays for instant clipping checks without squinting at a histogram.


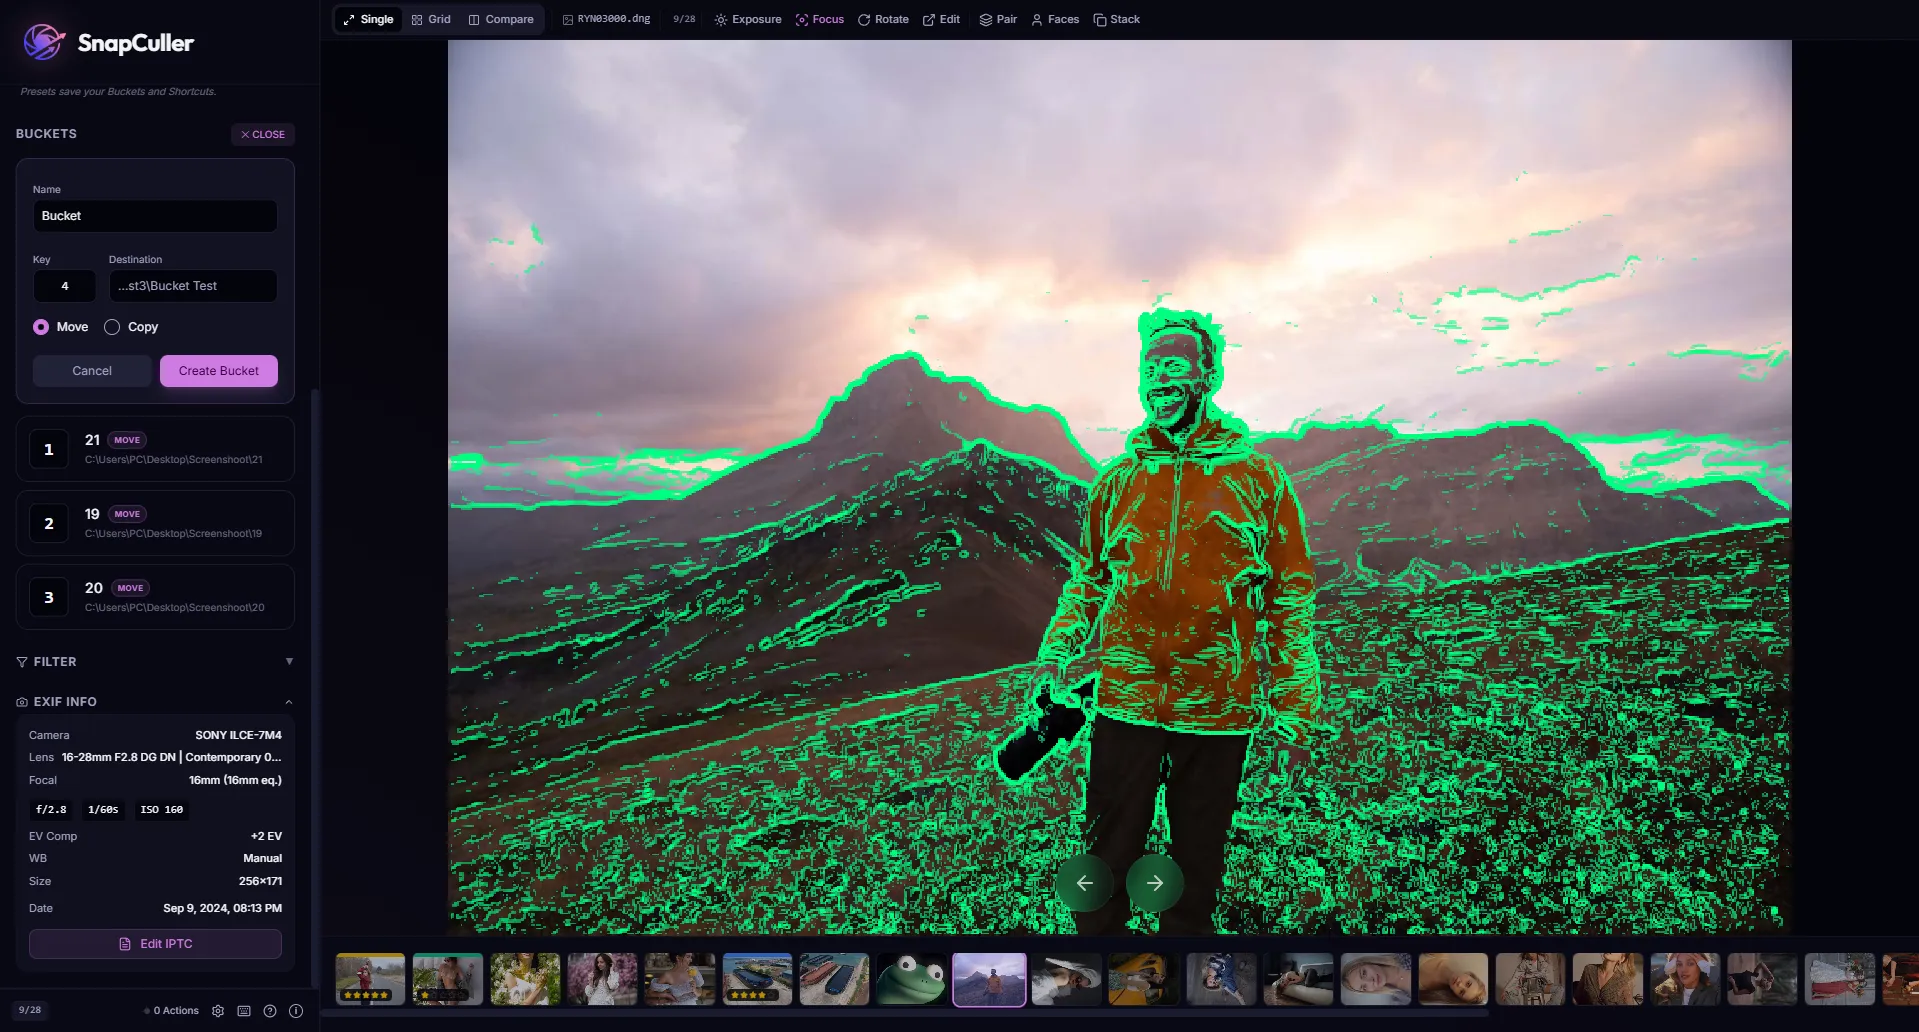
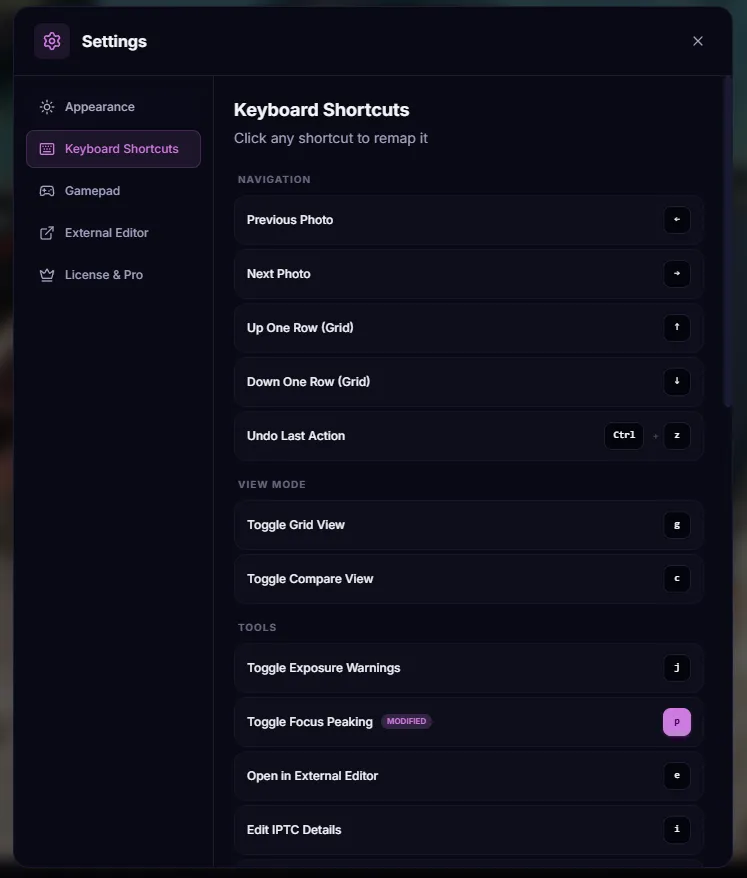
Focus Peaking (Pro Feature)
Verify sharpness in a glance. Press Shift + P to see high-contrast edges glow as the focal plane reveals itself.
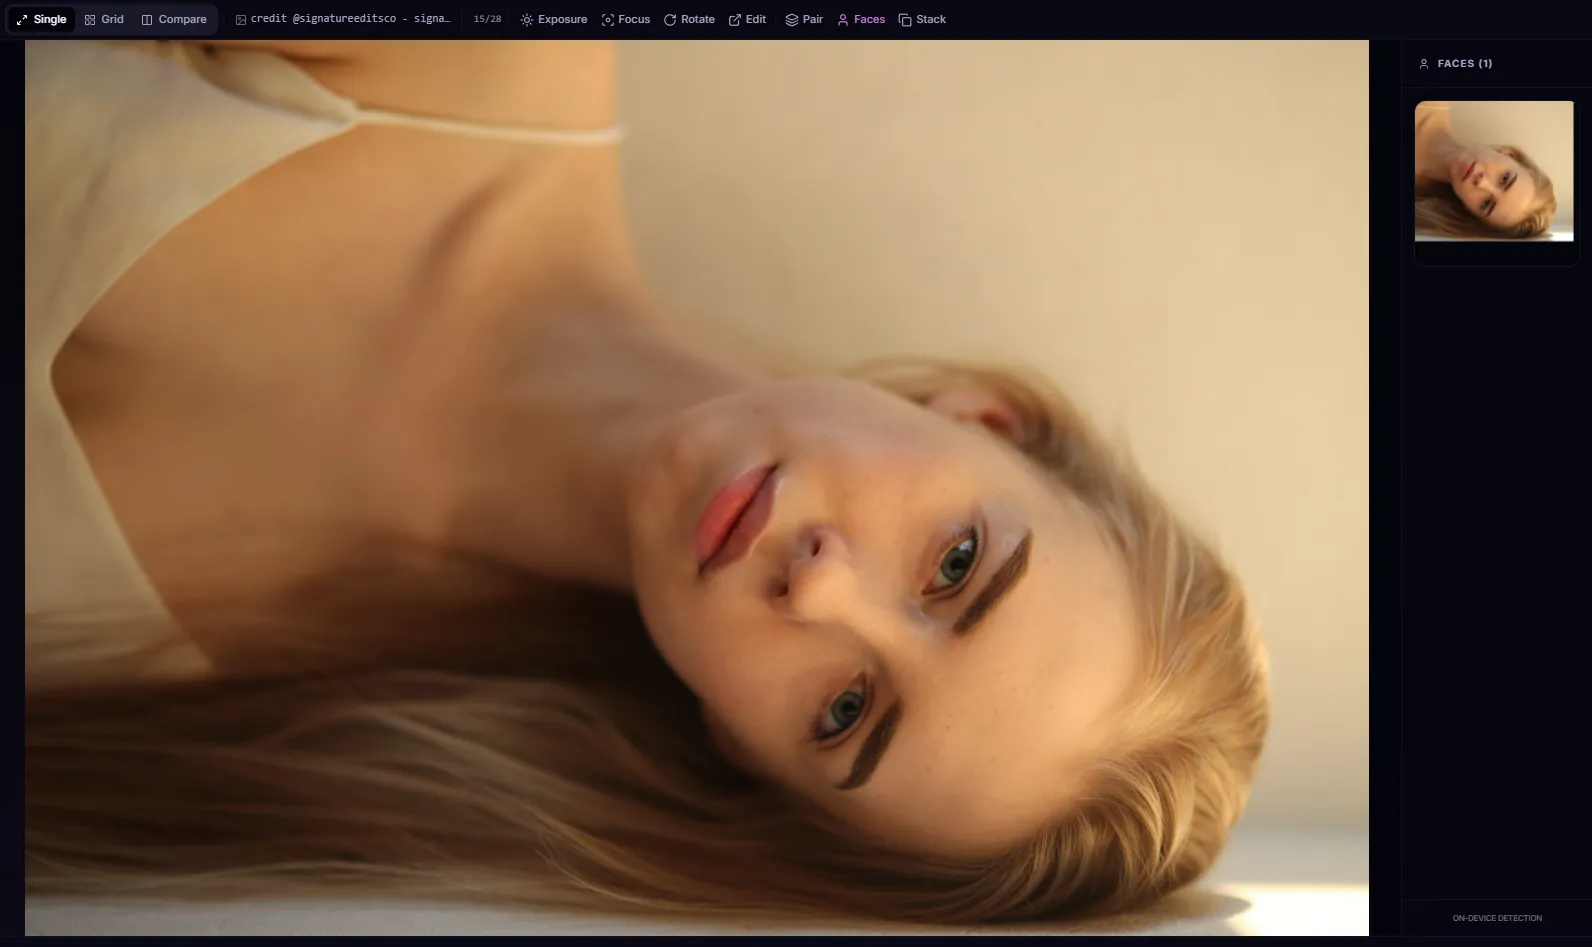
AI Face Detection (Pro Feature)
The Facestrip is a SnapCuller exclusive. Press F and the local AI crops every face into a panel so you can verify focus on the eyes, not the eyelashes.
Orientation
Rotate without leaving the review screen.
— masterclass —
AI Smart Culling & Orchestration (Pro Feature)
SnapCuller v1.2.6 introduces a groundbreaking Pro AI orchestration engine. Instead of manually reviewing thousands of photos, SnapCuller's AI analyzes technical perfection (focus, exposure, blinks) and aesthetic quality, then automatically categorizes your library based on your exact instructions.
Multi-Model Architecture
SnapCuller doesn't lock you into a single ecosystem. Go to Settings > AI Engine to select your provider:
OpenAI (Cloud)
Utilizes GPT-4o. Unparalleled accuracy for complex scenes, micro-expressions, and group photos.
Google Gemini (Cloud)
Utilizes Gemini 1.5. Incredible throughput and speed for massive events and sports batches.
Ollama (Local)
100% offline. Zero subscription costs. Requires a dedicated GPU for optimal performance.
Privacy First: Your API keys never leave your machine. Images are transmitted securely over HTTPS directly to the provider and are explicitly opted-out of AI training data.
The 4 AI Workflows
SnapCuller's AI adapts to your preferred organizational style. Open the Smart Culling modal from the sidebar to choose your workflow:
1. AI Bucket Routing
The most aggressive automation. The AI evaluates photos and physically moves/copies them into designated folders on your hard drive (e.g., "Accepted", "Rejected", "Review"). Perfect for rapid triage before importing into Lightroom.
2. AI Rating (Industry Standard)
The AI assigns 1 to 5 stars based on technical perfection and aesthetic value. You configure the baseline (e.g., Winners = 5 Stars, Good = 3 Stars, Rejects = 1 Star). Ratings are embedded instantly into the XMP metadata.
3. AI FlaggingComing Soon
A binary system for Lightroom users. The AI assigns a "Pick" flag to winners and a "Reject" flag to out-of-focus or duplicate shots. This workflow is currently in active development for upcoming releases.
4. AI Color LabelingComing Soon
The AI color-codes photos based on quality tiers or lighting conditions. This workflow is currently in active development for upcoming releases.
AI Insights & Culling Justifications (Pro Feature)
When the AI curator processes an image, it doesn't just return a raw percentage score. Under the hood, SnapCuller generates a rich, contextual AI Insight—a blunt, professional justification (up to 25 words) referencing active quality checks (e.g., "Perfectly frozen action at peak moment" or "Soft focus or cluttered composition").
These insights are displayed directly in the AI Panel (right sidebar) and the Culling Summary Modal once culling is completed, helping you immediately understand the reasoning behind the AI's curation decisions.
Licensing Note: AI Insights are an exclusive Pro Feature; on the free tier, AI analysis scores are displayed, but detailed written justifications are locked under the "AI Insights Restricted" banner.
Dynamic Safeguards & Burst Suppression
SnapCuller goes beyond simple photo evaluation; it understands the context of your shoot through Shoot Type Profiles (Wedding, Portrait, Sports, Landscape).
- Smart Best Suppression: If you shoot a 15-frame burst of the bride walking down the aisle, the AI evaluates the entire group holistically. It identifies the absolute sharpest photo with the best expression, assigns it the "Winner" rating, and suppresses the remaining 14 duplicates to "Good" or "Reject". This keeps your final delivery clean and prevents catalog bloat.
- Blink & Expression Safeguards: Automatically detects mid-blinks or awkward micro-expressions, preventing technical successes with bad timing from being rated as Winners.
- Dynamic Intensity: Control the AI's strictness. "Standard" mode keeps roughly 80% of usable shots, while "Extreme" mode acts as a brutal curator, keeping only the top 5% portfolio-grade images.
— chapter 5 —
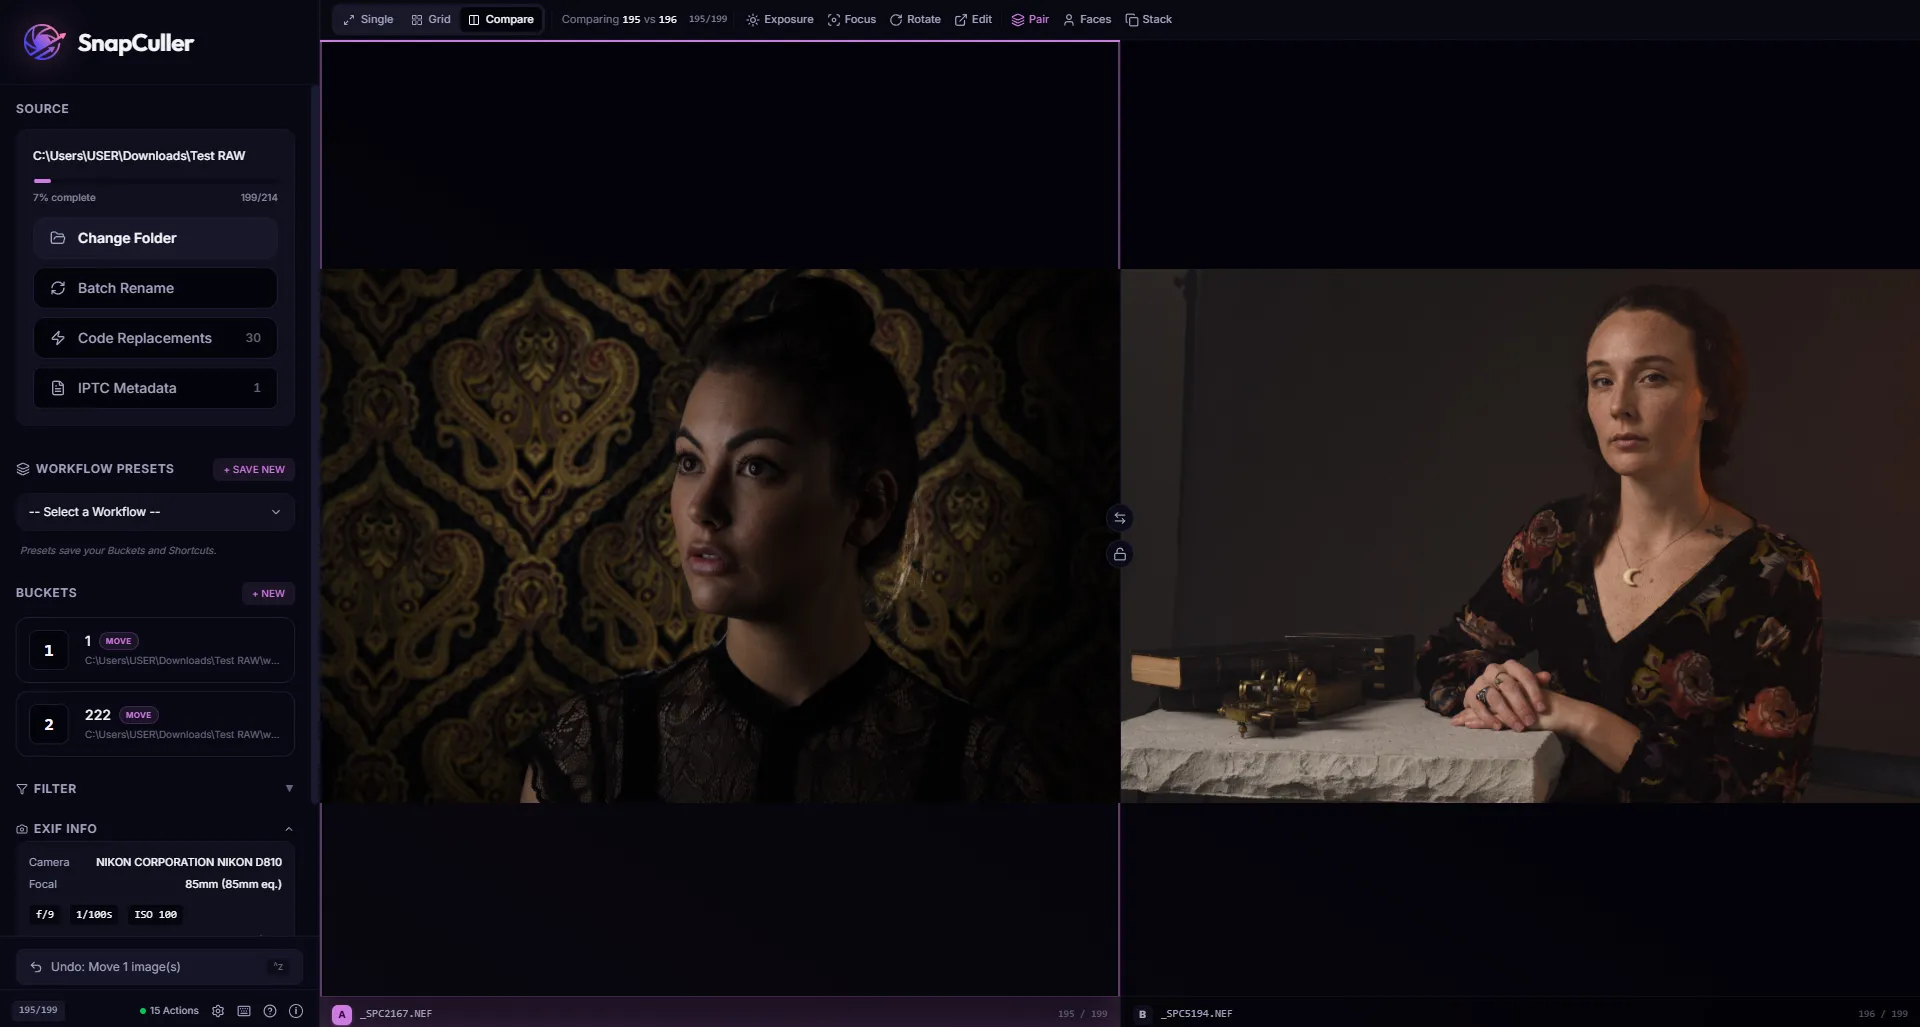
Compare Mode (Pro Feature)
Two or three nearly-identical frames? Press C to enter side-by-side comparison with synchronized pan and zoom.
- Activation: select multiple, hit C.
- Zoom sync (Pro Feature): lock panels to pan and zoom in unison.
— chapter 6 —
Metadata & IPTC
SnapCuller is a full IPTC editor. We write non-destructive .XMP sidecars, your originals are never altered.
Single image
Edit titles and tags inline in the EXIF panel, or hit I.
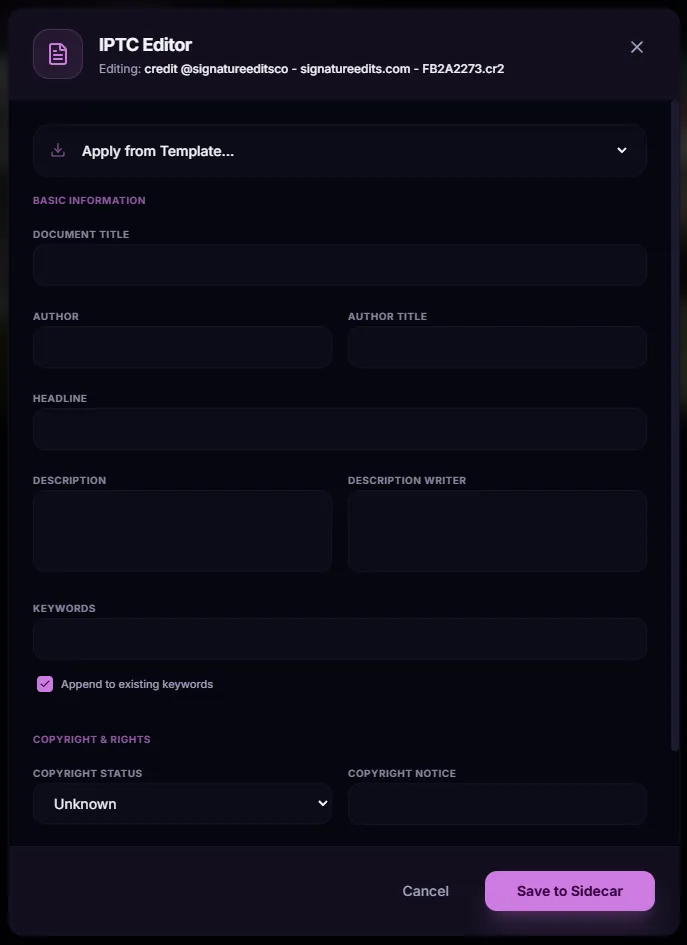
Batch IPTC
In Grid (G), select many, hit I. Apply tags to hundreds of frames at once.
Compatibility: Lightroom, Capture One, and Photo Mechanic read the same XMP. Just open the folder — ratings and metadata appear automatically.
— chapter 7 —
Power user tools
Master these to cut workflow time by up to 80%.
Auto-Advance Navigation
Keep your momentum and stay in the flow state. When enabled, SnapCuller automatically moves to the next photo 150ms after you assign a rating, flag, or color label.
- How to toggle: Click the fast-toggle FastForward button in the top header bar, or go to Settings > Appearance > Workflow Behavior and toggle the iOS-style switch.
- Completely Free: Unlike other tools that charge for auto-advance, this workflow booster is 100% free for all SnapCuller users.
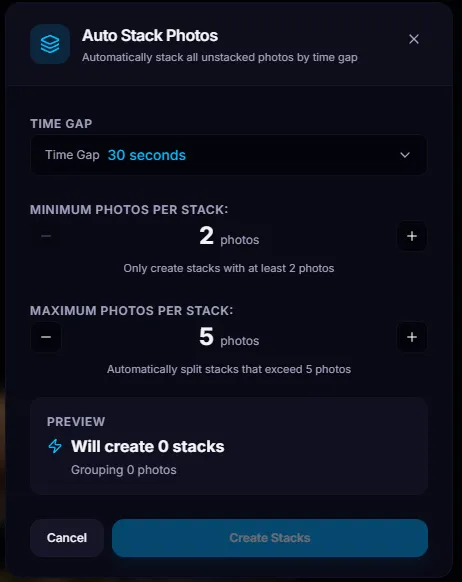
Auto Stacking (Burst Grouping)
Navigating bursts of 20 photos is tedious and slows down your culling. SnapCuller solves this with time-based grouping.
- Click the Layers icon or press Ctrl+G / ⌘ Cmd+G to open the Auto Stacking modal.
- Set a time gap (e.g., 2 seconds). SnapCuller will instantly group all photos taken within 2 seconds of each other into collapsible "Stacks".
- Cull by group instead of individual photos, expanding a stack only when you need to pick the absolute best shot.
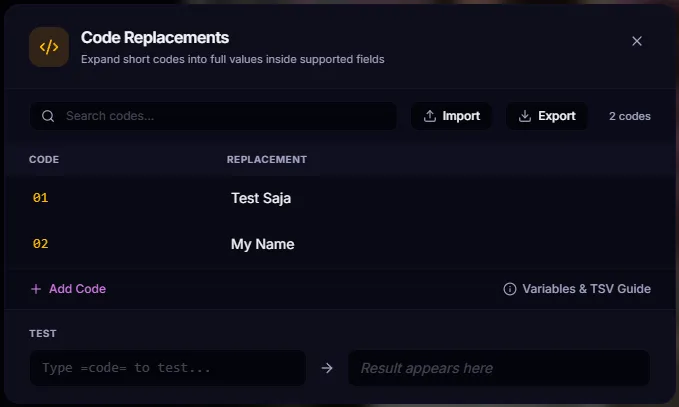
Codes & variables
- Type =code= to expand to a defined replacement from your imported dictionary (e.g. =12= expands to "Tom Brady").
- =code=2 grabs the 2nd column of an imported TSV.
- EXIF variables: {model} {lens} {iso} {filename} {date}.
- Sequential batching: {seq} auto-pads (001, 002…).
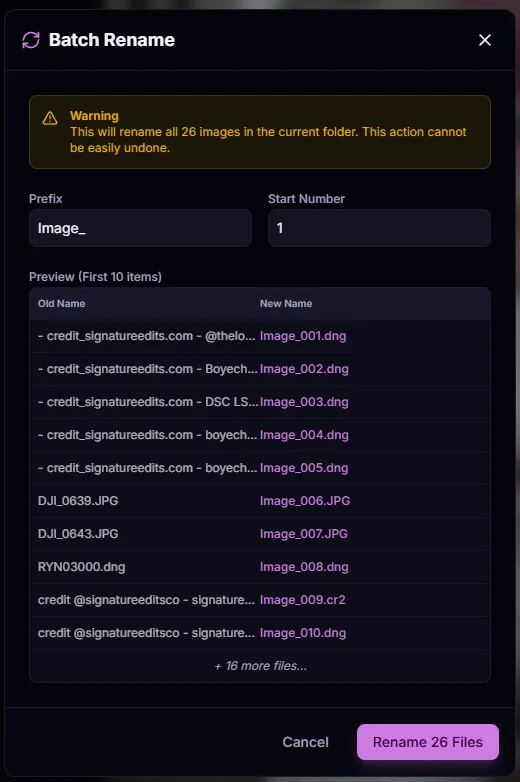
Batch Rename (Pro Feature)
Standardize your file names before delivery using dynamic variables like {model} {lens} {date} {seq}.
Note: SnapCuller safely renames the JPG, the RAW, and the XMP sidecar simultaneously to prevent broken links.
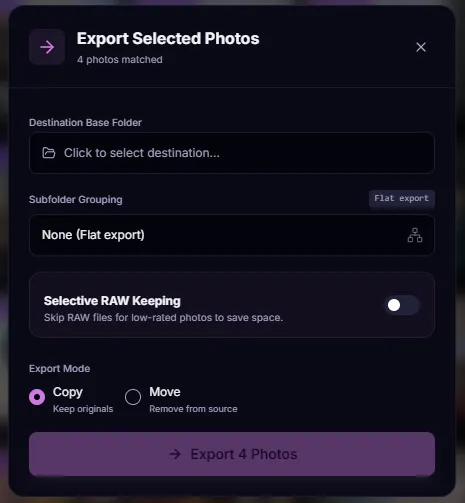
Export & Physical Routing
- Subfolder grouping: auto-organize into "Approved", "Web Ready"…
- Copy vs Move: duplicate for safety or relocate for cleanup.
- Selective RAW keeping (Pro Feature): only keep RAWs above a rating threshold (e.g., Export both RAW+JPG for 5-star photos, but only JPG for 1-star photos).
— chapter 8 —
Customization
Keyboard remapping
Every key is remappable. Match your muscle memory from any other tool.
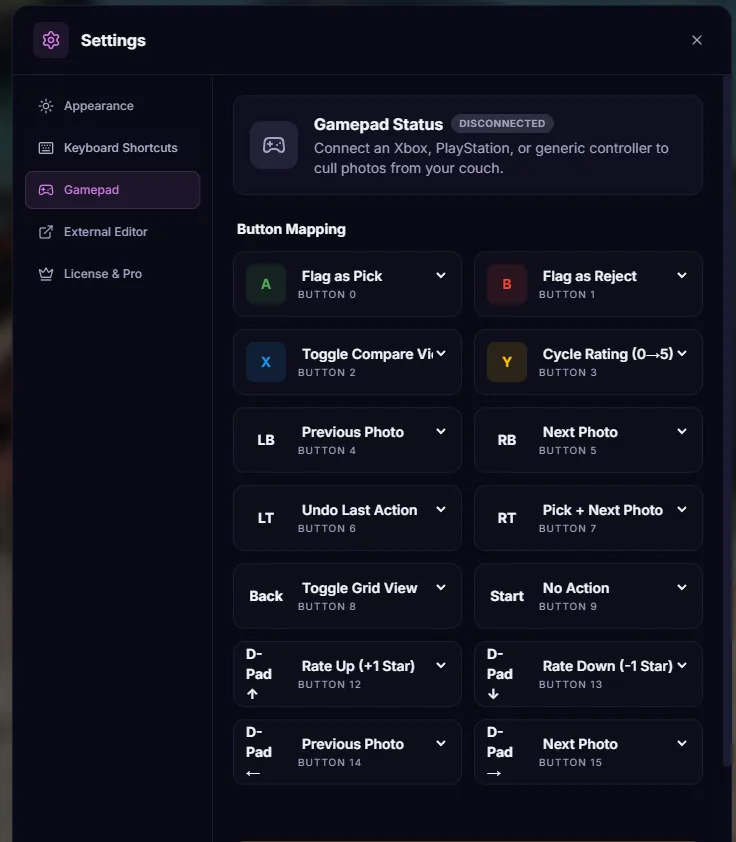
Gamepad support
Lean back and cull with an Xbox or PS5 controller. Triggers zoom, face buttons rate.
Visual themes
Personalize for contrast and reduced fatigue during marathon sessions.
.webp)
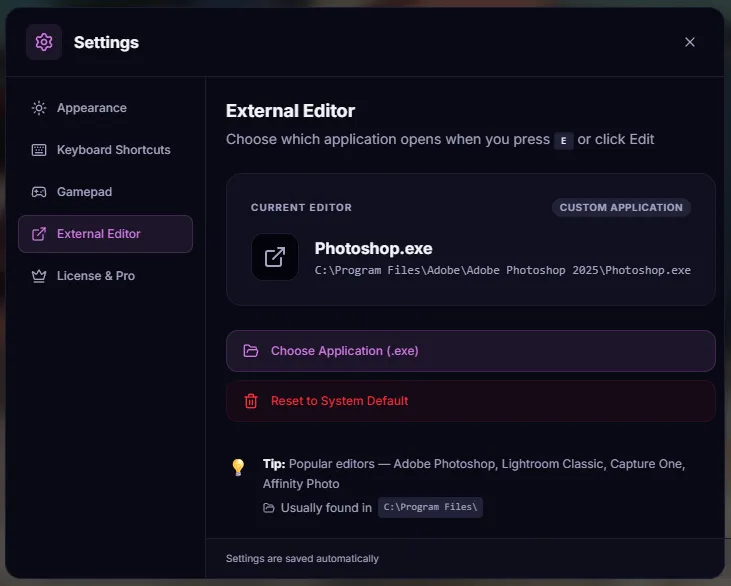
External editor linking
Link Lightroom, Photoshop, Capture One, and open the current frame in one click.
— licensing —
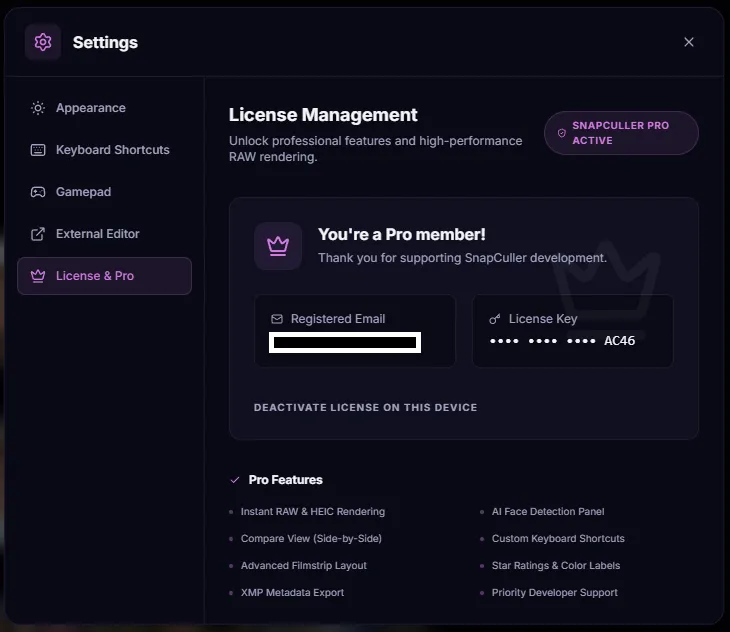
License management
Your Pro license is flexible, manage activations directly in the app.
- Device switching: deactivate on desktop, move to laptop.
- Offline use: once activated, SnapCuller works fully offline.
- License manager
— support —
Troubleshooting & FAQ
Why are my RAW files not loading?+
Make sure the folder isn't locked by another process (like a backup tool). If issues persist, check you have at least 5GB free for the preview cache.
Can I use my Photo Mechanic code files?+
Yes, SnapCuller supports standard TSV (Tab-Separated) files. Import them in the Code Replacements manager.
Does SnapCuller modify original RAW data?+
Never. All metadata is written to non-destructive .XMP sidecar files. Your originals are bit-for-bit identical.
Will my work show up in Lightroom?+
Yes. SnapCuller follows the IPTC/Adobe XMP standard. Open the folder in Lightroom, Capture One, or Photo Mechanic, and ratings, labels, and tags appear automatically.
Is there a Mac version?+
Yes! SnapCuller is available for both Windows and macOS. Download it from the homepage.
master your craft
The Professional Guide to Culling
Culling is the most critical stage of the post-production workflow. It is the process of distilling thousands of raw moments into a curated collection of masterpieces. SnapCuller is designed to facilitate this transition with zero friction. Below are the four primary strategies you can employ to conquer any shoot size.
Method 1: The Binary Triage (Pick and Reject)
The Foundation of Speed
For the initial "rough cut" of a major session, the Pick and Reject system is peerless. Instead of debating the nuance of a 3-star versus a 4-star rating, you make a simple binary choice: Is this a keeper? By reducing every image to a "Yes" or "No" decision, you eliminate decision fatigue and maintain a blistering pace of review.
Method 2: Qualitative Ranking (Star Ratings)
Nuance and Tiers
Star ratings are best utilized during your second pass. Once you have removed the technical failures, you can begin to tier your keepers. This method is industry-standard for professional photographers who need to categorize images for different delivery outputs: such as social media highlights, full client galleries, or high-end portfolio pieces.
Method 3: Status Management (Color Labels)
Visual Indicators
Color labels act as instant visual cues in your filmstrip and grid. While stars measure quality, colors often measure "state." Many professionals use Red for images requiring complex retouching, Yellow for client review, and Green for images that are ready for final delivery.
Method 4: Physical Routing (Buckets)
The Workflow Shortcut
Buckets are the ultimate power-user feature. Instead of tagging a photo and moving it later, Buckets physically move or copy the files (including their XMP sidecars) to a destination folder the moment you press a key. This allows you to cull and organize your hard drive in one single motion.
— the masterclass —
The Binary Workflow: Speed Culling
Professional Note: This tutorial focuses specifically on the Pick/Reject flagging system, which is the most efficient method for rapid selection and triage of large photo sessions.
📖 Read the full article: We published a complete step-by-step guide with examples and visual aids on our blog: How to Cull Your Photos Using Flag Keys in SnapCuller →
Flags are superior for your initial review pass because they force a simple decision: Keep or Toss. By removing the complexity of tiered ratings, you maintain high momentum and reach the end of your shoot significantly faster.
Phase 1: The Elimination Round
Your objective is to identify technical failures quickly. Focus on removing out of focus shots, closed eyes, and accidental bursts. Do not concern yourself with aesthetics at this stage: simply identify the obvious errors.
- Enter Single View by pressing Enter on your first image.
- Navigate through your collection using the → arrow key.
- When you identify a failure, press X to mark it as Rejected.
Phase 2: The Selection Round
Once the technical failures are removed, return to the beginning of your shoot to identify the emotional and compositional winners.
- Review the remaining images at a steady pace.
- When you see a compelling photo, press P to mark it as a Pick.
- If you need to reset a status, press U to unflag the image.
Phase 3: Finalizing Your Selection
With your winners identified, you can now focus on the final curation for your client or portfolio.
- Switch to Grid View by pressing G.
- In the Filter panel, select the Picked status.
- SnapCuller will instantly isolate your selected winners, allowing you to perform a final check before moving to your editing software.
— advanced ranking —
The Ranking Workflow: Tiered Evaluation
Professional Note: This tutorial focuses on the Star Rating system, which is ideal for categorization and quality tiering once your initial selection is complete.
While flags are used for binary Keep/Toss decisions, Star Ratings allow you to categorize your images into tiers: such as standard client deliveries, blog highlights, and portfolio hero shots.
Phase 1: Tiering Your Content
Review your selected photos to differentiate standard quality from exceptional work.
- Filter by Picked images to ensure you are only ranking your best work.
- Assign 3 Stars (Alt + 3) to images intended for standard client delivery.
- Assign 4 Stars (Alt + 4) to images with exceptional composition or lighting.
- Assign 5 Stars (Alt + 5) to your absolute hero shots for portfolio use.
Phase 2: The Final Hero Pass
Isolate your highest rated images to ensure your final selection is truly representative of your best work.
- Adjust your filters to show only 4 Star and 5 Star images.
- Perform a side by side comparison by pressing C to decide between similar high quality frames.
- Upgrade or downgrade ratings as needed to refine your final high end selection.
Phase 3: Intelligent Storage Management
Optimize your disk space by intelligently managing your RAW files based on their quality rating.
- Access the Settings menu and enable Selective RAW Keeping.
- Establish a rating threshold: such as 4 stars.
- During bucket movement, SnapCuller will preserve RAW files for high quality images while moving only JPG previews for lower tiers.
— visual organization —
The Categorization Workflow: Color Coding
Professional Note: This tutorial focuses on the Color Label system, which is designed for tracking project status and managing complex shoot organizations.
Color labels provide instant visual identification in your filmstrip. Unlike ratings which measure quality, labels are best used to track the "state" of a photo: such as its editing progress or its belonging to a specific scene.
Phase 1: Defining Your Status Lights
Establish a consistent meaning for each color to maintain a disciplined workflow across your entire team or project.
- Red (Alt + 6): Mark images requiring complex retouching or object removal.
- Yellow (Alt + 7): Mark images awaiting client approval or further review.
- Green (Alt + 8): Mark images that are fully processed and ready for delivery.
- Blue (Alt + 9): Mark images intended for special creative treatments: such as black and white conversion.
Phase 2: Visual Batch Management
Utilize the Grid View to gain an immediate overview of your project's health and completion status.
- Open Grid View by pressing G to see color badges on your thumbnails.
- Use the Filter panel to isolate specific colors: allowing you to focus purely on images that still require attention.
- Rapidly batch apply labels to multiple selections to reorganize entire sequences in seconds.
Phase 3: Scene based Organization
Alternatively, use color labels to separate different chronological segments of a large event.
- Assign distinct colors to segments like "Preparation", "Ceremony", and "Reception".
- This provides a high level visual map of the shoot structure in your filmstrip.
- Combined with Filtering, this makes navigating an 8 hour event shoot effortless.
— advanced automation —
The Physical Workflow: Bucket Routing
Note: The Free tier is limited to a maximum of 3 custom buckets, while the Pro tier supports unlimited custom buckets.
Professional Note: This tutorial focuses on the Bucket system, the most powerful automation tool in SnapCuller for physical file organization and delivery prep.
Buckets move beyond simple metadata. They physically reorganize your hard drive as you cull. By mapping keys to specific destination folders, you can eliminate the need for a final export phase entirely.
Phase 1: Configuring Your Destinations
Prepare your project structure by defining where your files should go based on your final decisions.
- Create an Accepted bucket mapped to your "Picks" folder with the Move action.
- Create a Rejected bucket mapped to a "Trash" folder to clear clutter from your main library.
- Create a Review bucket using the Copy action for images that require a second opinion from a client or lead editor.
Phase 2: Format Preferences & RAW+JPG Handling
SnapCuller's intelligent pairing engine ensures your data is always safe and synchronized.
- When creating a bucket, you can set a Format Preference (Both, JPG only, or RAW only).
- If you shoot RAW+JPG and press the bucket shortcut, SnapCuller automatically finds both the `filename.RAW` and the `filename.JPG` (regardless of capitalization) and moves them together as a single atomic unit.
- It also automatically brings along the `.xmp` sidecar file, ensuring your Lightroom edits are never lost.
Phase 3: High Speed Physical Triage
Execute your file movements in real time as you perform your review, ensuring your hard drive is organized by the time you reach the last photo.
- Navigate through your shoot in Single View.
- Press the assigned hotkey (e.g., 1 or 2) to instantly route the current file to its bucket.
- Error Recovery: If a file is moved incorrectly, press Ctrl + Z to instantly reverse the last physical movement. The file (and its RAW/XMP pair) will be returned to its exact original location and restored to the active session.
ready?
Stop reading. Start culling.
The fastest way to learn SnapCuller is to drop a folder in and press P.