tutorial
How to Speed Up Photo Culling with Burst Stacking in SnapCuller
the problem
Why burst mode creates a culling nightmare
Every photographer has been there: you hold down the shutter for a three-second burst and suddenly have 30 nearly identical frames in your gallery. Multiply that across an entire wedding, sports event, or portrait session, and you are staring at thousands of photos where 80% are duplicates of the same moment.
Scrolling through these one by one wastes enormous amounts of time. You lose your flow comparing frame 17 to frame 18 when the difference is a millimeter of eye position. Traditional culling tools force you to evaluate every single frame individually, even when most of those frames are burst duplicates.
Burst Stacking solves this by automatically grouping consecutive burst shots into a single visual unit — a stack. Instead of seeing 30 individual thumbnails, you see one thumbnail with a badge that says "30." You evaluate the group, pick the best frame, and move on.
2,000 photos in grid. Endless scrolling. Burst duplicates everywhere. You spend 3 hours culling and still miss the best frame.
600 visual items in grid. Bursts collapsed into clean stacks. You focus on unique moments, pick the sharpest frame, and finish in under an hour.
how it works
Understanding burst stacking
SnapCuller's stacking engine analyzes the EXIF timestamps of your photos. When multiple photos are captured within a short time window (the "time gap"), they are grouped into a single stack. The cover image — the first frame in the burst — represents the entire group in Grid View.
Key concepts
A group of consecutive burst photos collapsed into a single visual unit. In Grid View, you see one thumbnail with a badge showing how many photos are inside (e.g., "Stack 12").
The maximum time interval between consecutive shots for them to be considered part of the same burst. Common values range from 2 seconds (fast bursts) to 30 seconds (HDR brackets or slow sequences).
The first photo in the stack that represents the group in Grid View. You can browse all other members by expanding the stack.
An optional cap that automatically splits large bursts into smaller groups. Set this to 5 for real estate HDR brackets, or leave it unlimited for long sports bursts.
auto stacking
Setting up Auto Stack
The fastest way to create stacks is to let SnapCuller do it automatically. The Auto Stack dialog analyzes every photo in your folder and groups them based on the time gap between shots.
How to use Auto Stack
- Open the Sidebar and look for the Stacking section, or use the Stack toggle button in the Grid Header.
- Click Auto Stack Photos to open the stacking dialog.
- Set the Time Gap. For high-speed burst shooting (sports, wildlife), a 2-second gap works well. For slower sequences (portraits, events), try 10–30 seconds.
- Set the Minimum Photos per Stack. The default of 2 ensures single photos are not stacked alone.
- Optionally, set the Maximum Photos per Stack to cap stack sizes. This is perfect for real estate photographers working with consistent HDR brackets of 5 or 6 exposures.
- Check the Preview at the bottom of the dialog to see how many stacks will be created before committing.
- Click Create Stacks.
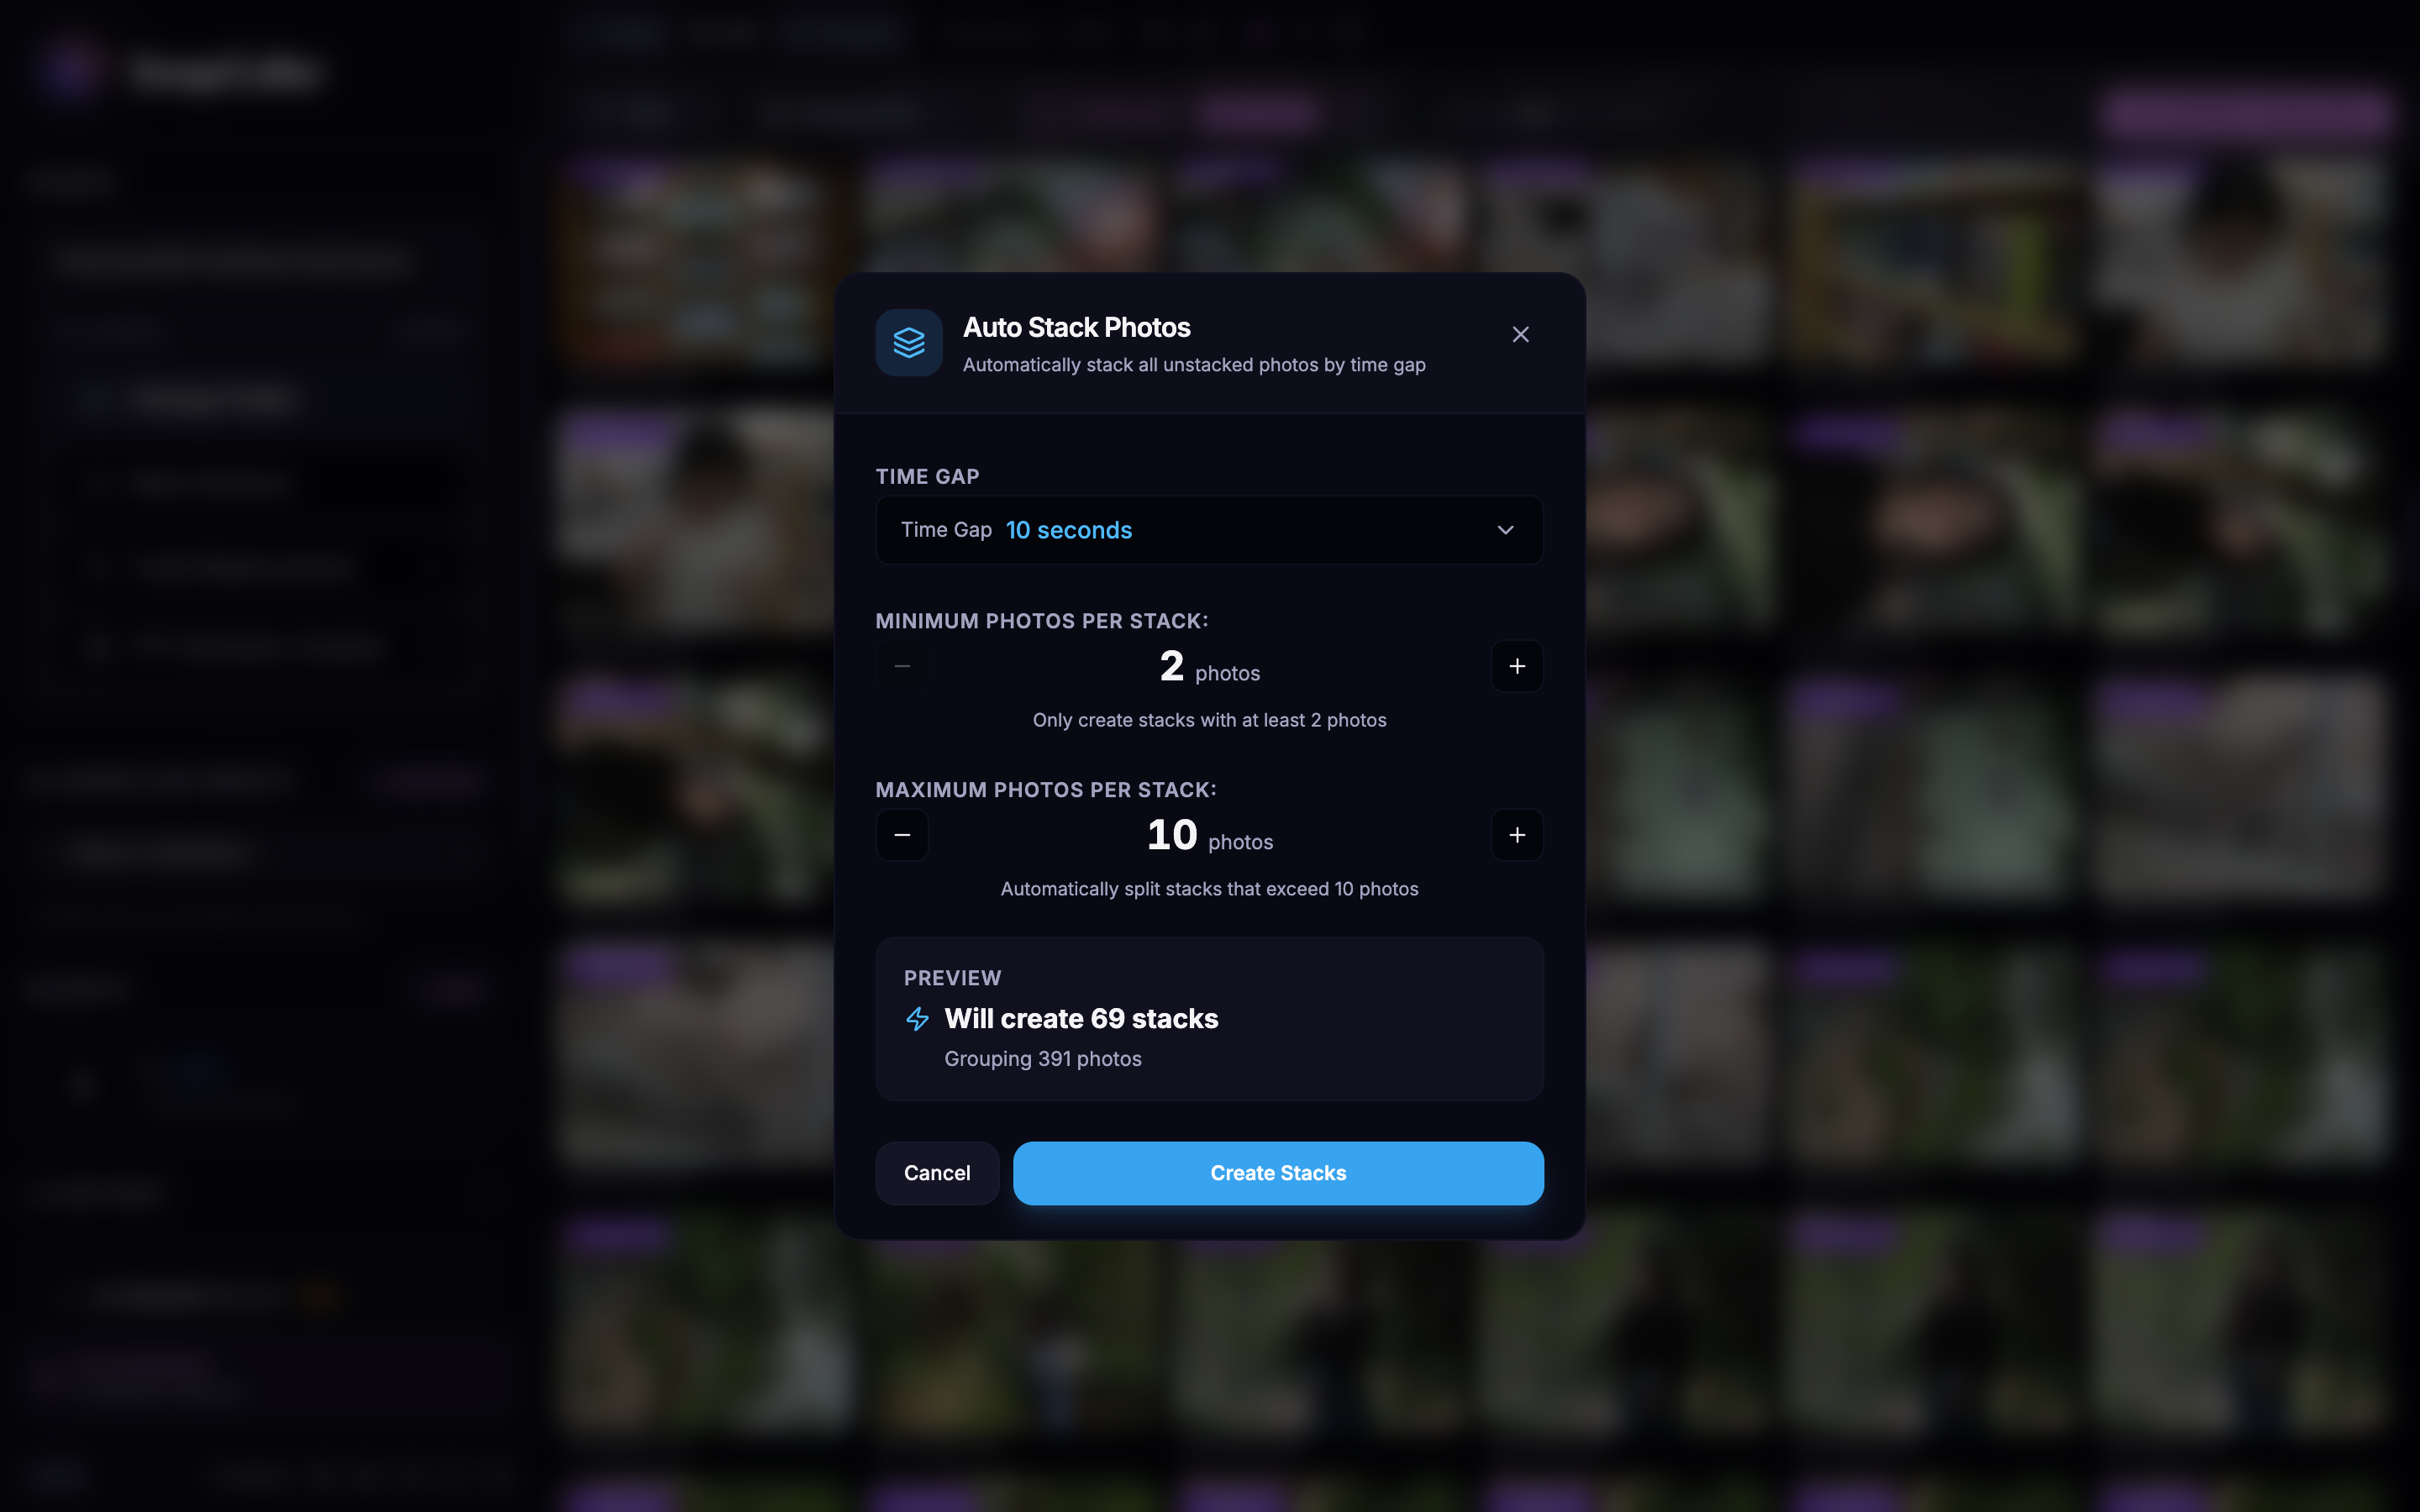
💡 Time Gap Guide: If you shoot at 10 fps (frames per second), a 2-second gap means any break longer than 2 seconds starts a new stack. For event photography where you take occasional bursts with pauses in between, a 5–10 second gap captures each distinct moment as its own stack.
💡 RAW+JPG Pairing: If you shoot in RAW+JPG mode, SnapCuller's stacking engine is fully pair-aware. A RAW+JPG pair counts as one logical shot when calculating stack sizes and groupings, so your stacks reflect actual unique moments — not inflated counts from duplicate file formats.
browsing stacks
Navigating and exploring stacks
Grid View: the big picture
When stacking is active, your Grid View transforms. Instead of seeing every individual frame, burst groups are collapsed into single thumbnails with a Stack badge showing the count. The header also updates to show both the total photo count and the visible item count after stacking.
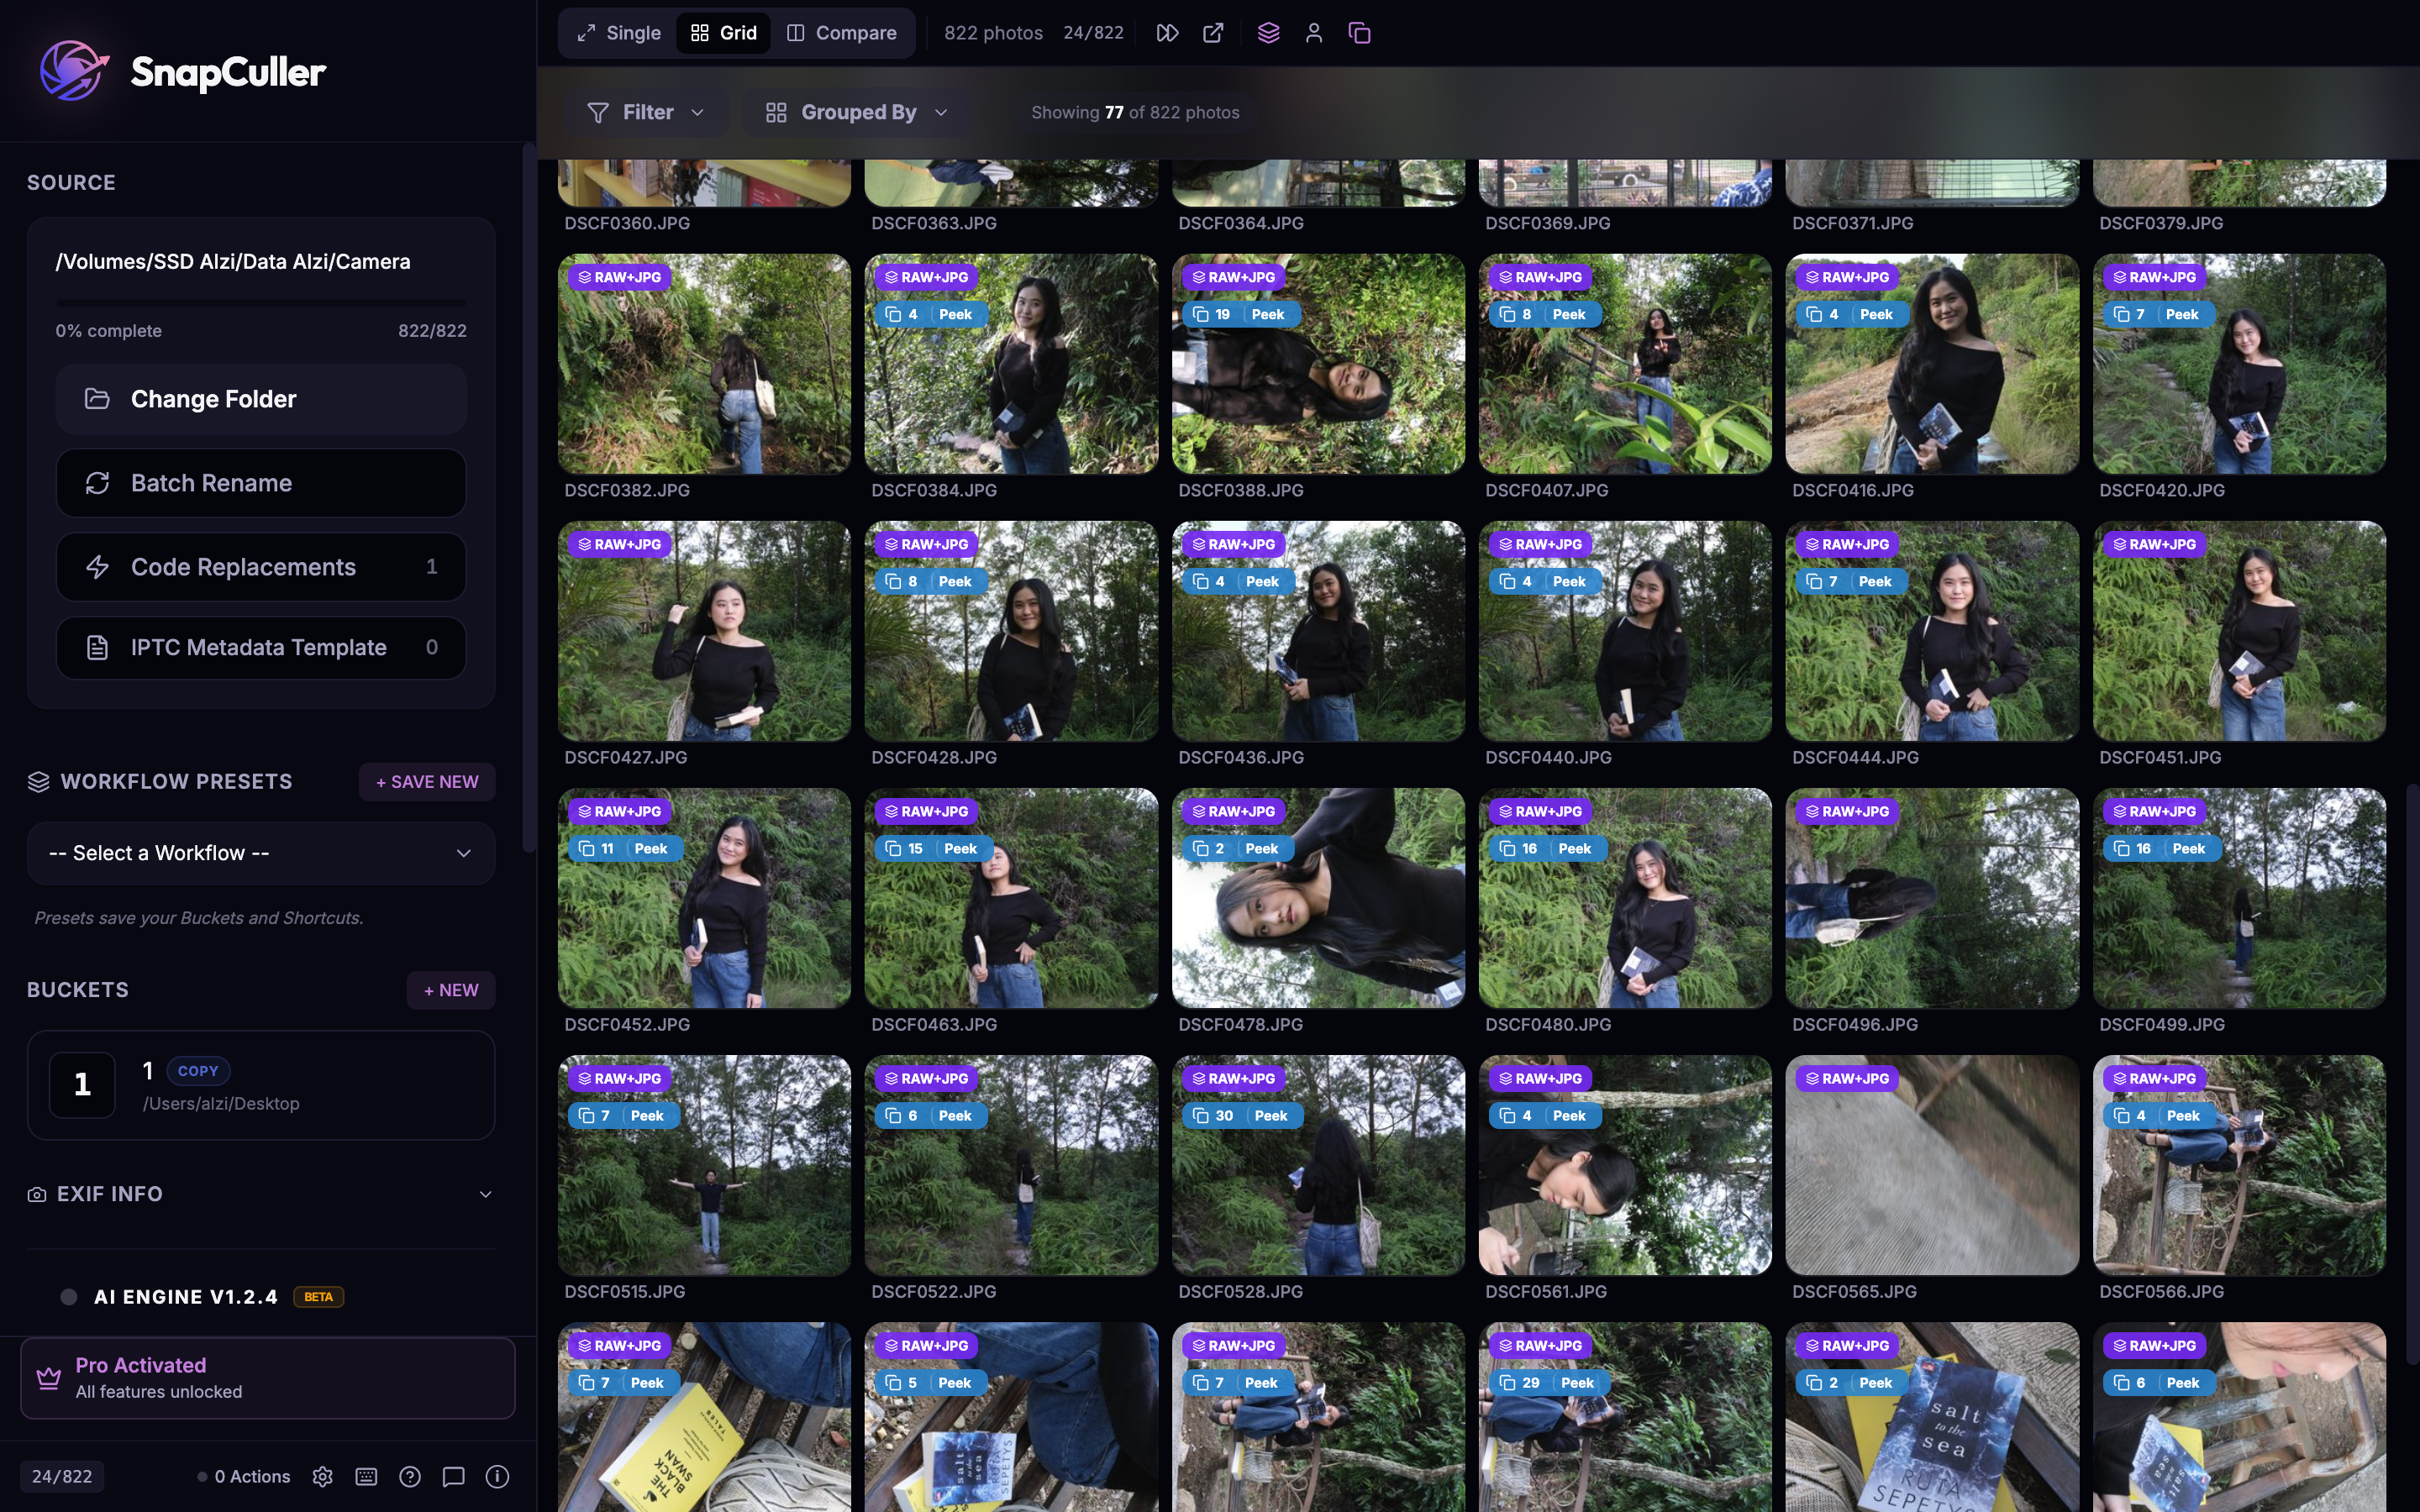
Peek Overlay: quick preview in Grid View
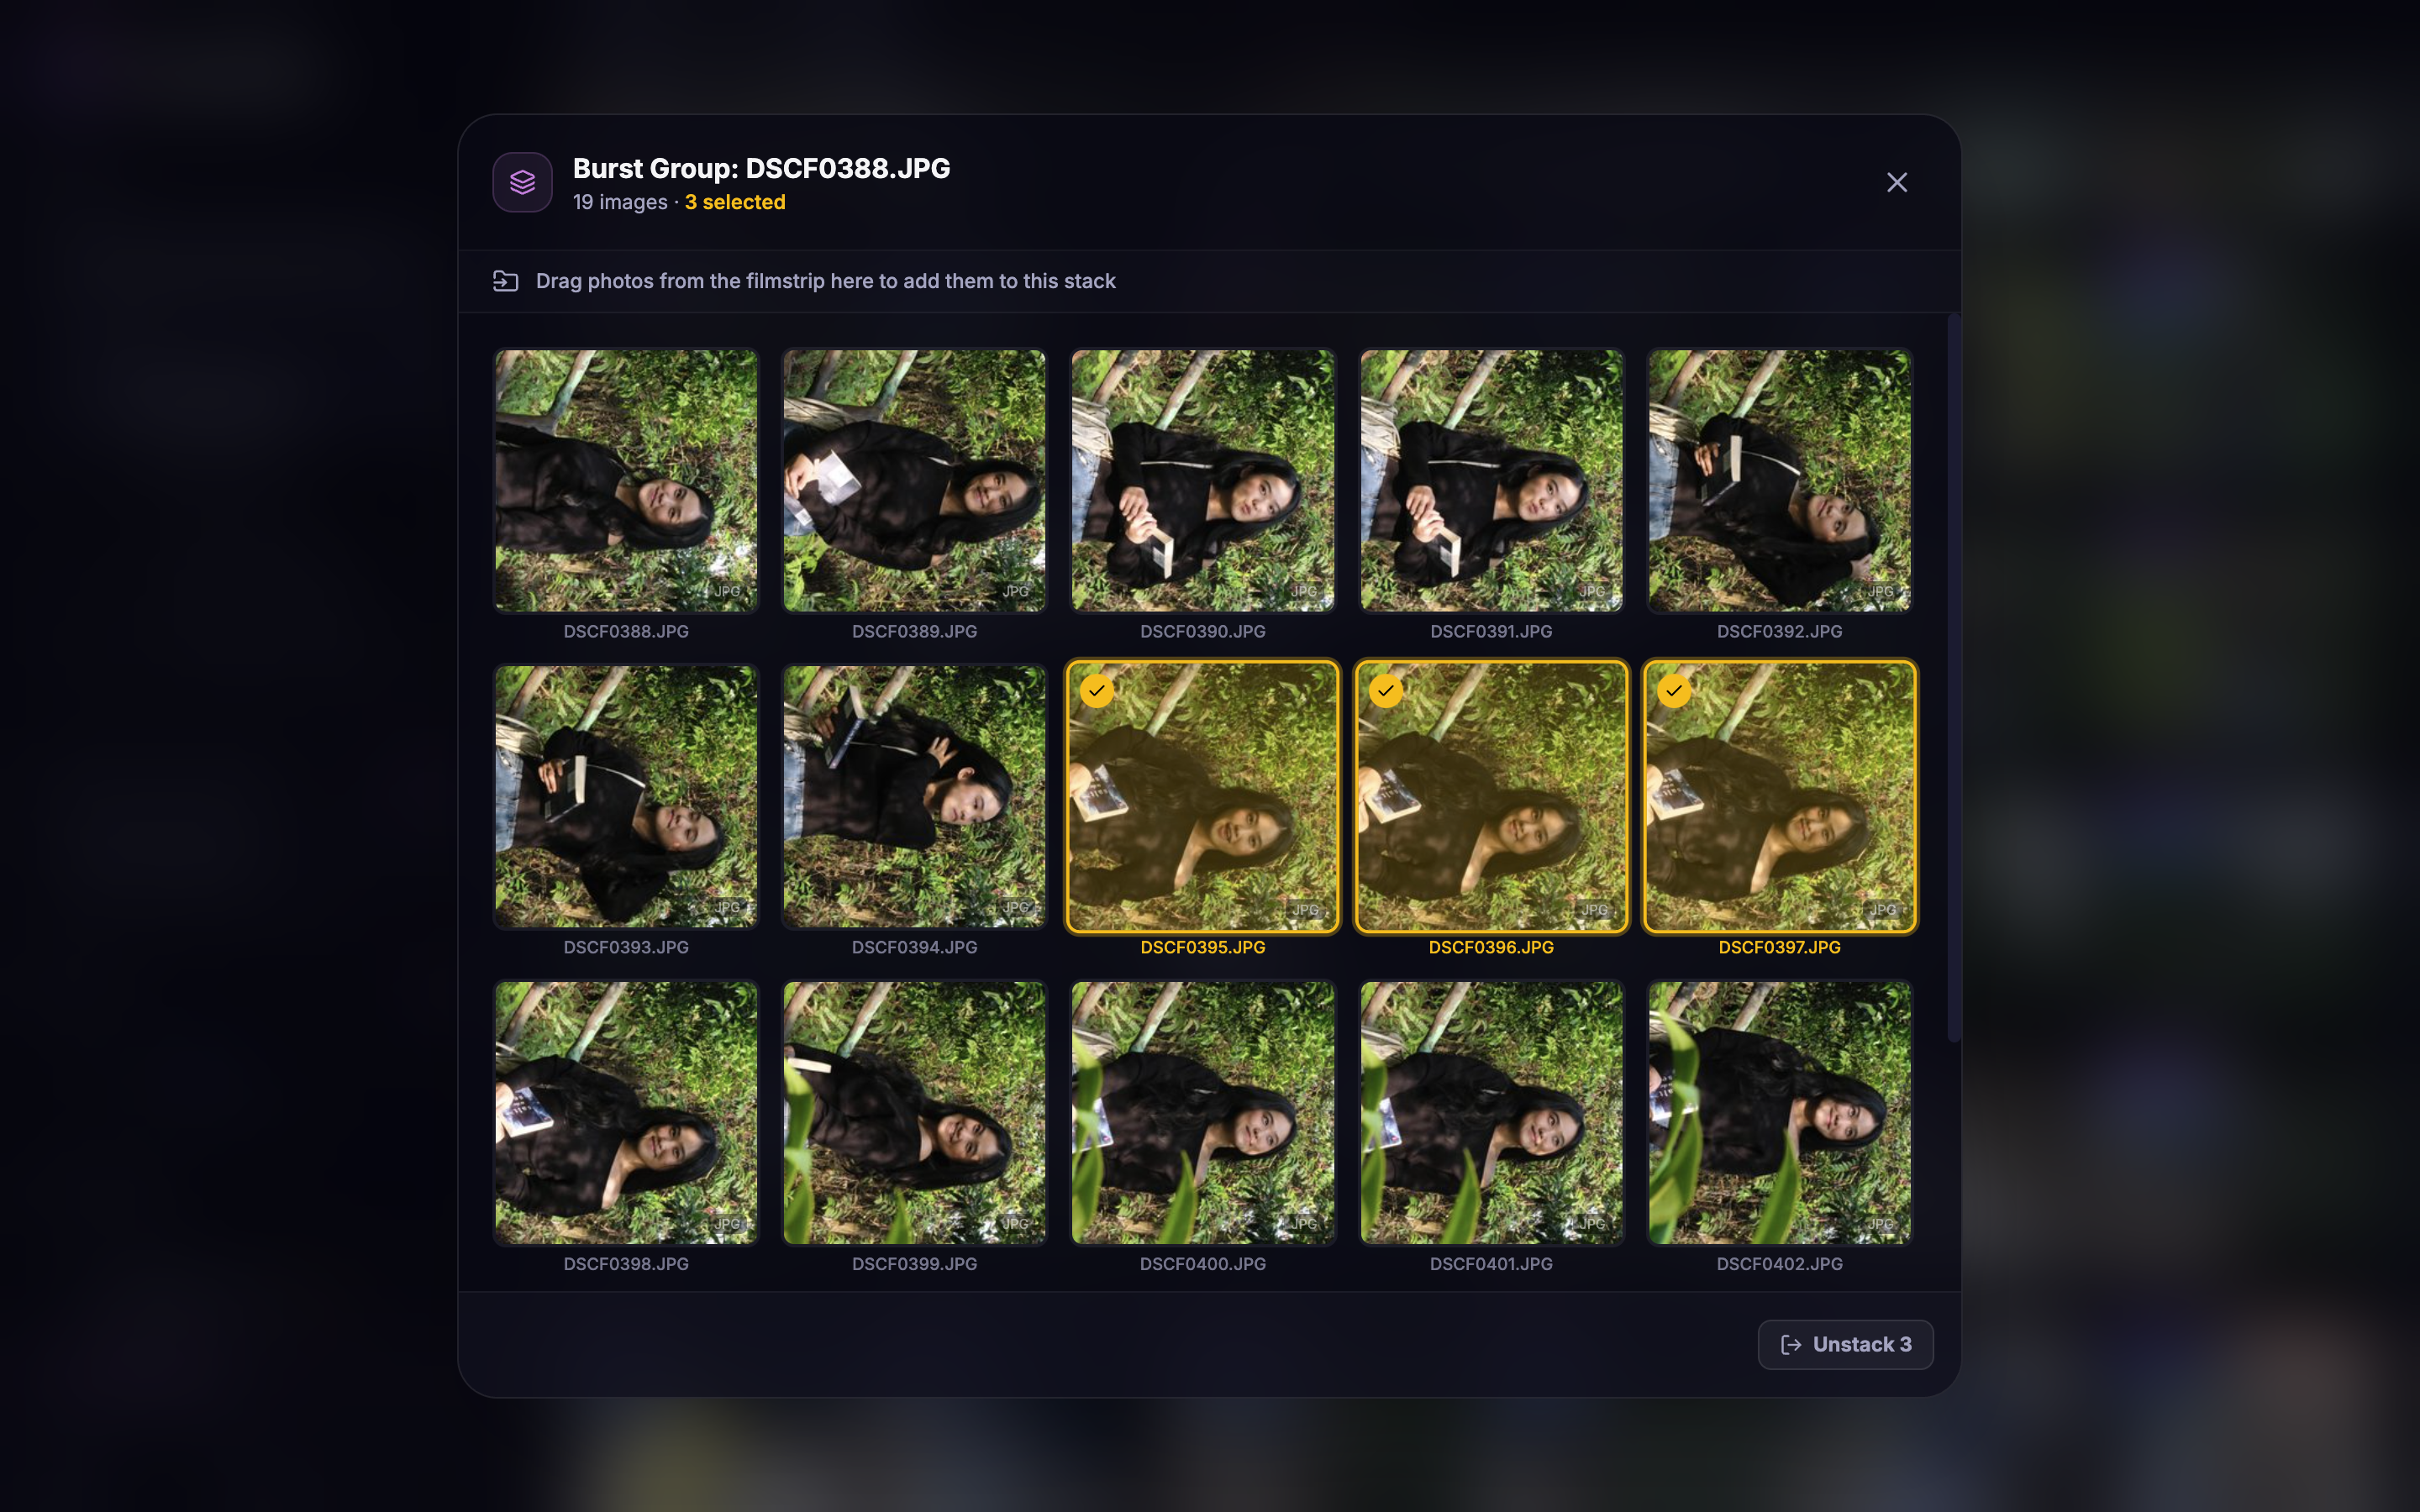
Want to quickly see what is inside a stack without leaving Grid View? Click the Peek button on any stacked thumbnail. A sleek overlay opens on top of the grid, showing all the frames in the stack. From here, you can select the best photos and Unstack them to pull them out of the group.
Stack Strip: detailed inspection in Single View
When you open a stacked photo in Single View, a Stack Strip appears as a horizontal filmstrip showing all members of the current stack. Click the Stack (N) toggle button in the toolbar to show or hide it.
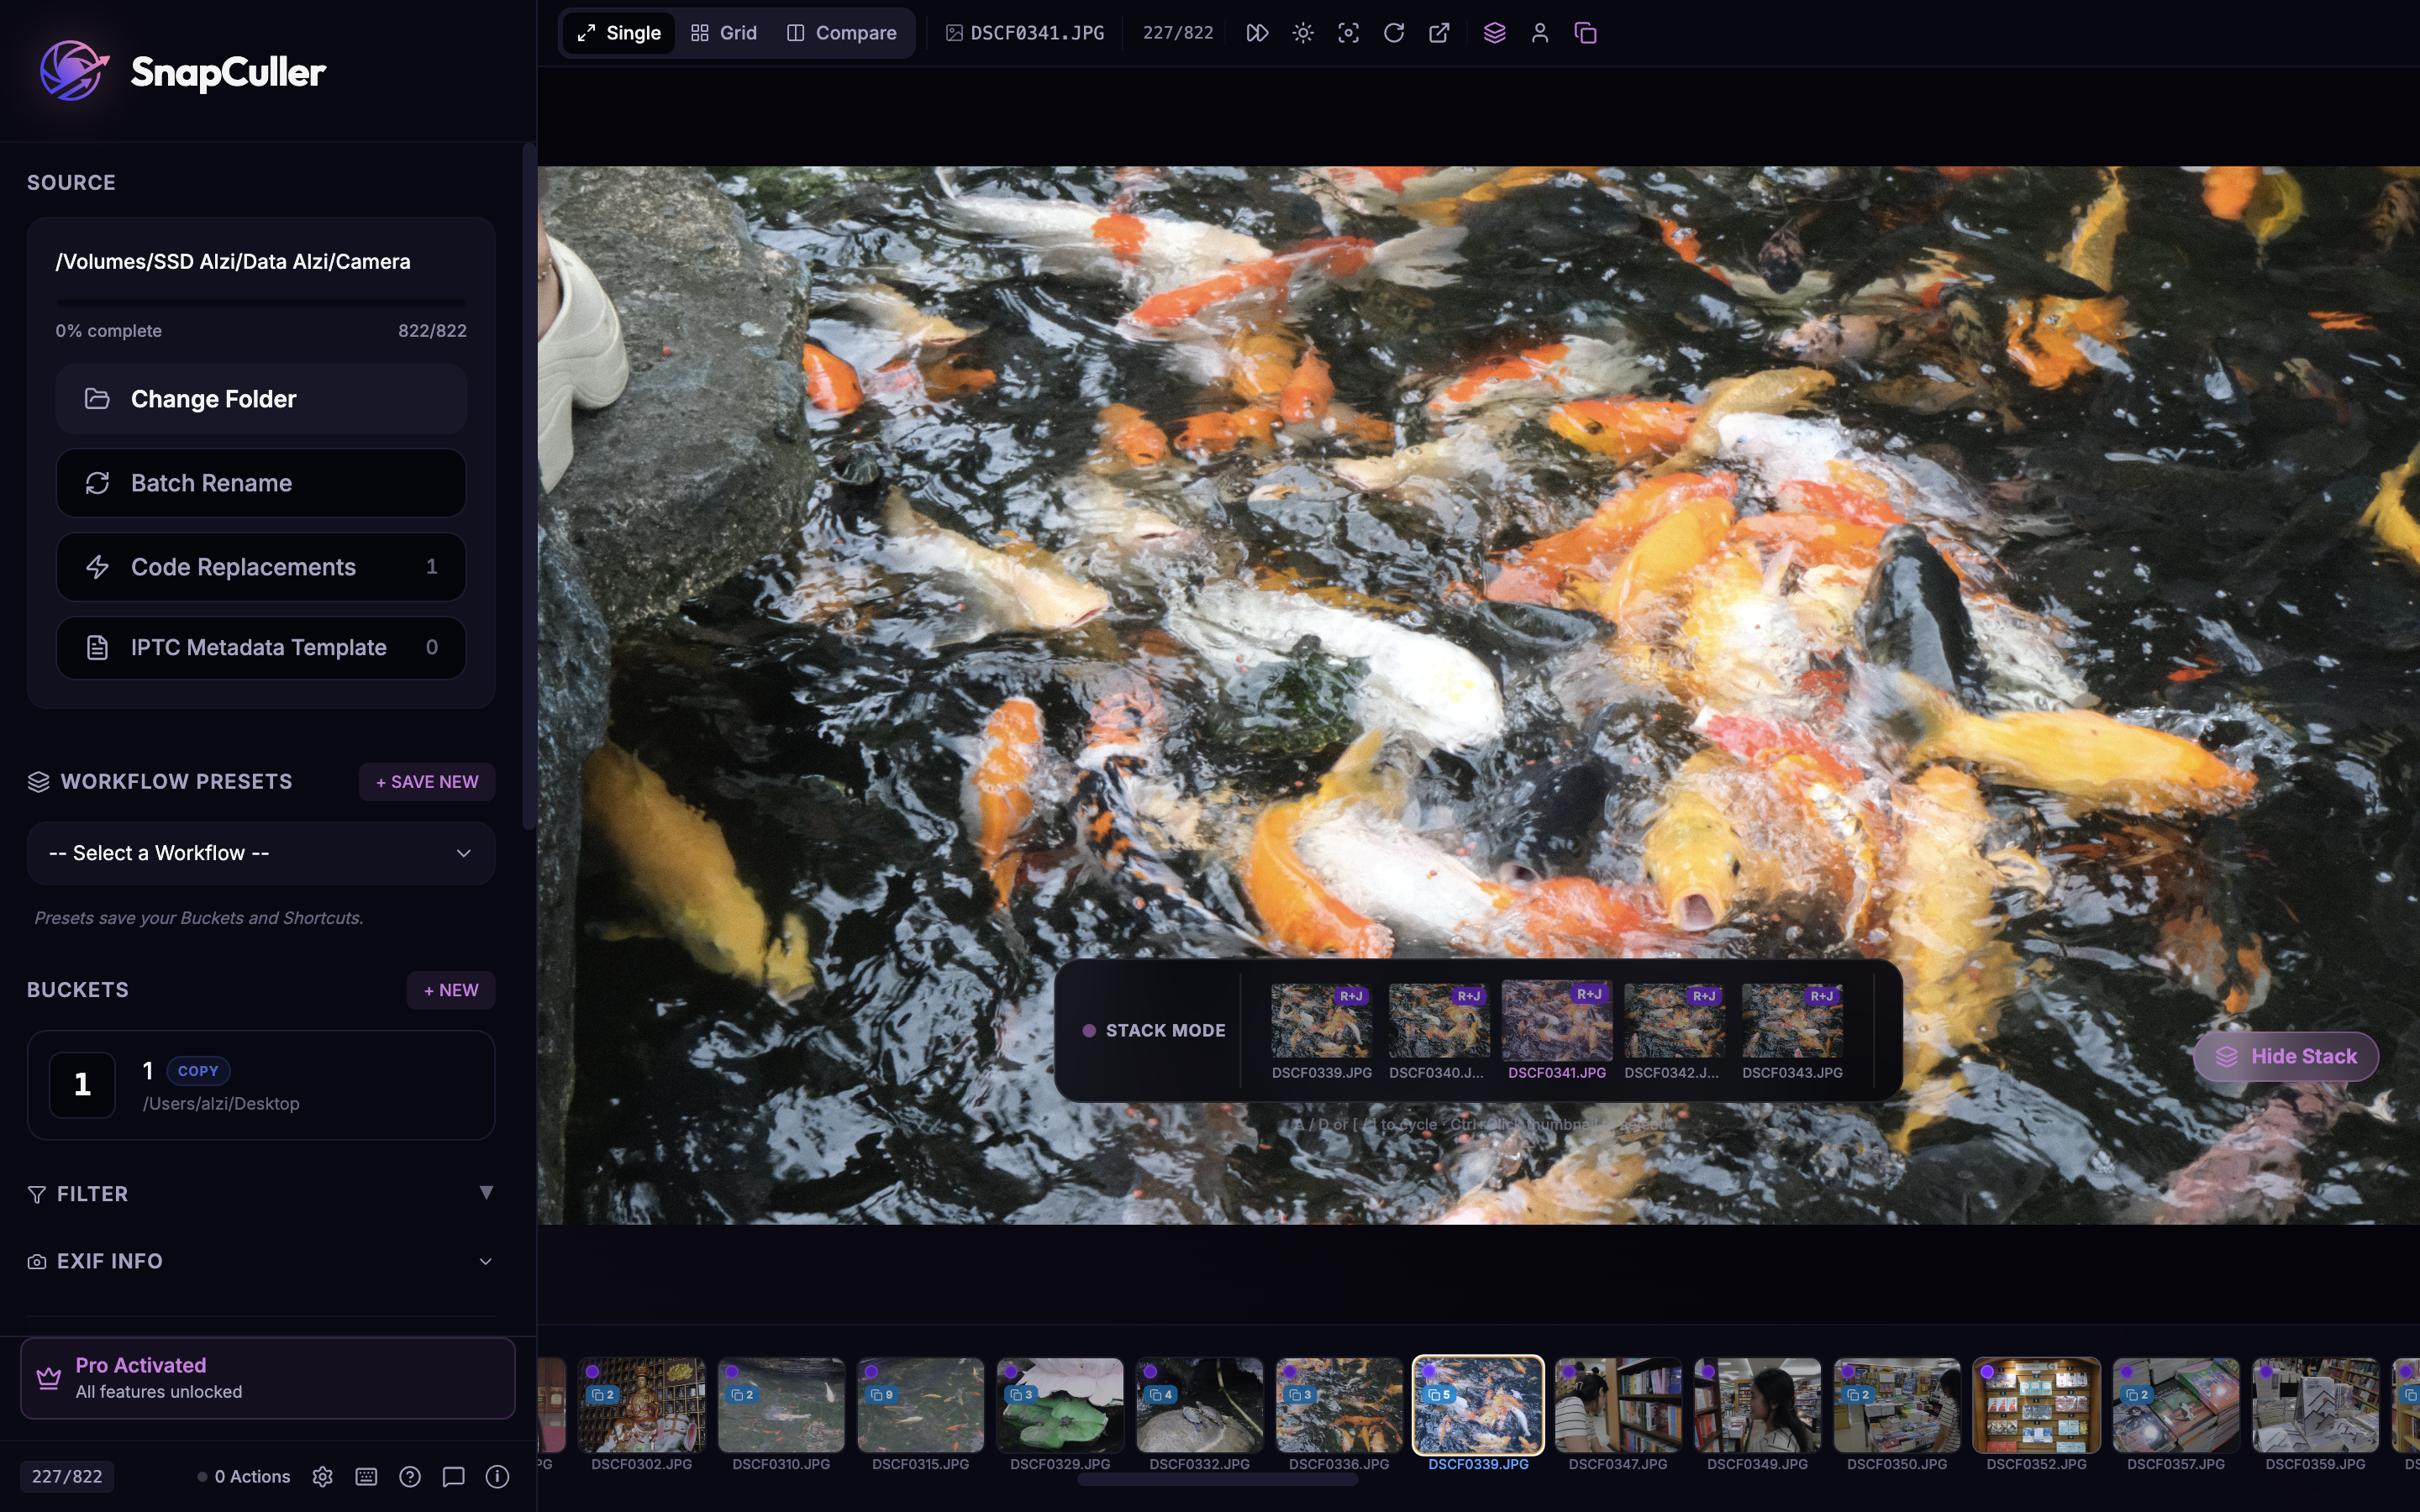
The Stack Strip stays closed by default to keep the workspace clean. When open, it provides a focused mini-gallery of just the burst group — perfect for comparing frames side by side without distraction from the rest of your shoot.
⌨️ Keyboard Navigation: Use [ and ] to cycle through images within the current stack. This is separate from the arrow keys, which navigate between stacks. Think of it as "inner navigation" vs. "outer navigation."
the workflow
Step by step: culling with stacks
1. Load your folder and enable stacking
Open the folder containing your shoot. Click Auto Stack Photos in the sidebar. Set your time gap based on how you shot (2 seconds for high-speed burst, 10+ for general event work), then hit Create Stacks.
Your grid immediately collapses. A 2,000-photo wedding might go from 2,000 visible items down to 600–800, depending on how many bursts you shot.
2. First pass: flag stacks in Grid View
Scan through the grid using the stacked thumbnails. For each stack:
- If the entire moment is a technical failure (wrong exposure, test shot, accidental shutter), press X to reject the stack. Every photo in the stack gets the reject flag.
- If the moment looks promising, skip it for now — you will come back in the next pass to find the best frame.
🔥 Why this is faster: In a traditional workflow, rejecting 10 burst duplicates requires 10 keystrokes. With stacking, rejecting the entire burst is a single X. For a shoot with 200 burst sequences, that is roughly 1,800 fewer decisions.
3. Second pass: pick the best frame from each stack
Now switch to Single View. Navigate to each surviving stack and open the Stack Strip by clicking the Stack toggle. Browse the burst members using [ and ] to cycle through them.
For each stack, find the sharpest frame with the best expression or moment, and press P to pick it. The other frames in the stack remain unflagged — they serve as backup alternatives.
💡 Pro Tip: Enable Focus Peaking before comparing burst frames. The sharpness overlay makes it trivial to spot which frame in a 10-shot burst has the sharpest focus on the subject's eyes. No need to zoom to 100% on each one.
4. Peek and Unstack to pull the perfect frame
When you want to pull the perfect frame out of a burst, simply click the Peek button on the stack in Grid View. This displays all photos in the stack. Select the files you think are best, then click Unstack. This pulls your chosen frames out of the group and places them back into your main grid, ready for your standard workflow.
5. Apply ratings, then export
Once you have picked the best frame from every stack, apply star ratings to tier your selections (see the star rating tutorial). Then filter to your desired quality level (e.g., 4+ stars, Picked flag), select all, and export.
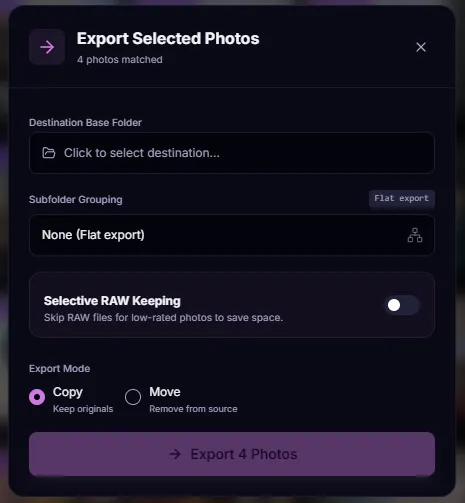
real-world scenarios
When to use stacking
Sports and wildlife photography
High-speed burst shooting is the norm. A single action sequence — a goalkeeper's dive, a bird taking flight — might generate 20–50 frames. Without stacking, your grid is overwhelmed with nearly identical images. With stacking:
- Time gap: 2 seconds. Sports bursts are fast and continuous.
- Max per stack: Leave unlimited. Let the natural breaks between action sequences define your stacks.
- Workflow: Use Focus Peaking to quickly find the sharpest frame in each action burst.
Wedding and event photography
Weddings mix burst moments (first kiss, confetti throw) with slower, deliberate shots (detail flat lays, venue wide angles). A wider time gap captures the burst moments while leaving standalone shots unstacked.
- Time gap: 5–10 seconds. Captures burst sequences while keeping individual shots separate.
- Min photos per stack: 3. This prevents slow pairs (like two casual portraits) from being stacked together.
- Workflow: Combine stacking with color labels. After picking the best frame from each stack, label by scene (Red = Ceremony, Green = Reception) for organized delivery.
Real estate and HDR photography
HDR brackets are the most predictable stacking scenario. Every shot is a fixed sequence of 3, 5, or 7 exposures. Stacking keeps each bracket as a clean unit.
- Time gap: 2–5 seconds (brackets are rapid).
- Max per stack: Set to your bracket count (e.g., 5). This prevents two adjacent brackets from merging into one oversized stack.
- Workflow: Review each bracket as a unit. Reject entire brackets where the exposure sequence failed (camera shake, moving subjects).
Portrait sessions
Portrait photographers often fire 3–5 quick frames per pose to ensure at least one has sharp eyes and a natural expression. Stacking groups these per-pose bursts together.
- Time gap: 5 seconds. Captures each pose burst while separating different poses.
- Workflow: Use the AI Face Detection panel alongside the Stack Strip. For each burst, check the face crops to find the frame with the best expression and sharpest focus on the eyes.
combine with other tools
Stacking + flags + ratings = maximum speed
Burst Stacking is most powerful when combined with the other classification tools in SnapCuller. Here is the complete three-layer workflow:
Auto Stack your folder to collapse bursts. Your visual item count drops dramatically. You are now working with moments, not individual frames.
Reject entire stacks that are technical failures. Pick the best frame from surviving stacks. Use flag keys for speed.
Apply star ratings and color labels to your picked photos. Filter, select, and export.
🚀 Real-world numbers: A photographer shooting a wedding at 10 fps typically generates 3,000–5,000 photos. Without stacking, culling takes 3–5 hours. With burst stacking reducing the working set to 800–1,200 visual items, combined with flag keys and auto-advance, the same cull takes 45–90 minutes.
smart actions
Stack-aware operations
When stacking is active, SnapCuller's batch operations become stack-aware. This means actions you perform on a stack automatically apply to all photos within it:
Moving or copying a stack to a bucket automatically includes all photos in the group, along with their associated RAW and JPG pair files. No frame gets left behind.
When the Stack Strip is open in Single View, keyboard shortcuts (bucket keys 1, 2, 3...) target the specific photo visible in the strip, not the entire stack. This lets you surgically pull individual frames from a burst group.
Ratings, flags, and color labels applied from the Stack Strip are saved to XMP sidecar files, just like any other metadata action. Your stacking decisions are fully compatible with Lightroom, Capture One, and Photo Mechanic.
tips
Pro tips for faster stacking workflows
🔍 Use Compare View for tough burst decisions
When two frames in a burst are nearly identical, press C to enter Compare View. Display them side by side with synchronized zoom and pan to the eyes. The frame with sharper focus wins.
⚡ Enable Auto-Advance for flow state
Turn on Auto-Advance in the header bar. After you press P, X, or a rating shortcut, SnapCuller automatically moves to the next photo (or next stack) after 150ms. This eliminates the need to press arrow keys between decisions.
🎮 Combine with AI Smart Culling
SnapCuller's AI culling engine includes a Best in Group feature that automatically picks the sharpest, most expressive frame from burst sequences. Run AI culling first, then use stacking to review and refine the AI's choices. The AI handles the rough cut; you make the final creative decisions.
💾 Save your stacking preferences with Workflow Presets
If you shoot the same type of work regularly (e.g., weddings at 10 fps with a 5-second gap), save your entire setup — including stacking settings, buckets, shortcuts, and preferences — as a Workflow Preset. Next time, load the preset and start culling immediately.
summary
Recap
Burst Stacking transforms how you handle high-volume shoots by collapsing burst sequences into manageable visual units. Instead of evaluating every individual frame, you work with moments — and only expand a stack when you need to find the best frame.
Set your time gap and let SnapCuller group bursts automatically. Preview results before committing.
Use Peek Overlay in Grid View for quick previews. Use Stack Strip in Single View for detailed inspection with [ and ] navigation.
Reject entire stacks in one keystroke. Pick the best frame per burst. Combine with flags, ratings, and labels for a complete workflow.
Whether you are shooting sports at 20 fps, weddings with quick bursts, or real estate with HDR brackets, Burst Stacking eliminates the visual clutter and lets you focus on what matters: finding the best moments in your shoot.
Combined with flag keys, star ratings and color labels, and AI Smart Culling, Burst Stacking completes SnapCuller's toolkit for handling shoots of any size with speed and precision.