tutorial
How to Cull Photos Before Importing to Lightroom (and Import Only Your Keepers)
the problem
Why cull before you import into Lightroom
Lightroom Classic is a great editor and a slow culler. Every file you import gets a catalog entry and a preview, so a 2,000-frame shoot means waiting for 2,000 previews to build, scrolling past 1,500 photos you will never edit, and a catalog that grows with every reject you forgot to delete.
Lightroom also has no real pre-import cull. The Import dialog lets you uncheck thumbnails, but you can't rate, flag or check focus at full size before the files are already in your catalog.
The faster workflow is to cull first, import second. You make the keep or reject decisions in a fast culling app, then hand Lightroom only the photos worth editing, with their star ratings already attached. This guide walks through that workflow in SnapCuller, one step at a time.
Wait for previews on every frame. Catalog fills with rejects. Culling competes with editing for the same slow Library module.
Instant embedded previews while culling. Lightroom only ever sees your keepers, already rated, so you can start editing the moment the import finishes.
before you start
What carries over to Lightroom (and what doesn't)
SnapCuller saves every decision twice: to its own workspace file in the folder, and to a standard XMP sidecar next to each photo, named like DSCF2330.xmp beside DSCF2330.RAF. Lightroom Classic reads that sidecar when it imports the RAW file. Here is what survives the trip:
| Decision in SnapCuller | Shows up in Lightroom? |
|---|---|
| ⭐ Star rating (1–5) | ✅ Yes, on RAW files |
| 🎨 Color label (Red, Yellow, Green, Blue, Purple) | ✅ Yes, on RAW files, with Lightroom's default label set |
| 🚩 Pick / Reject flag | ⚠️ Not as a Lightroom flag. Lightroom keeps flags in its catalog, not in XMP |
| 🖼️ Anything on a JPEG | ⚠️ No. Lightroom ignores sidecars for JPEGs and only reads metadata embedded in the file |
💡 The rule of thumb: use flags to decide what gets imported, and stars and color labels for everything you want to see inside Lightroom. The workflow below follows that split.
step 1
Copy the card and open the folder
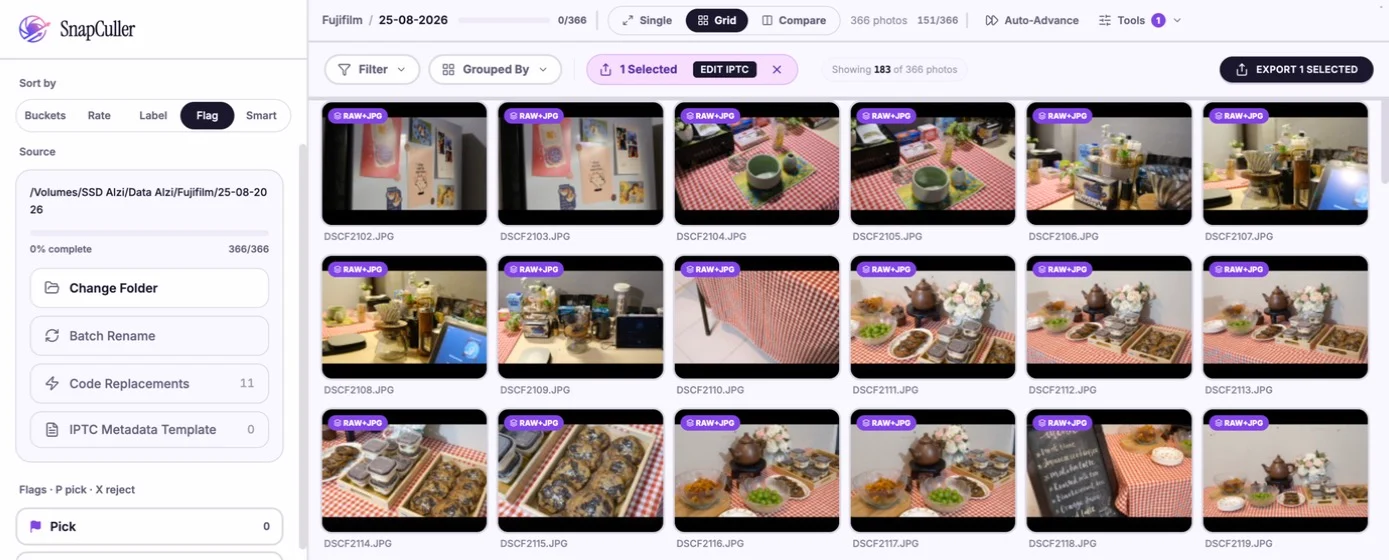
Copy the card to a folder on your computer or an external SSD first. Culling straight off the card is slower, and you don't want to move files off the only copy you have. Then open SnapCuller, click Change Folder and pick that folder.
If you shoot RAW+JPEG, SnapCuller pairs each RAW with its JPEG automatically (look for the RAW+JPG badge) and treats the pair as one photo. You rate one thumbnail and both files get the decision. SnapCuller also shows you the JPEG straight away instead of waiting for a RAW decode, which is why big folders open without a loading spinner.
step 2
First pass: pick or reject, fast
The first pass answers one question per photo: is this worth a second look? Don't rate yet. Switch the sidebar's Sort by to Flag so the counters for Pick, Reject and Unflagged stay in view, open the first photo in Single View (double-click it, or press Enter in the grid), and go:
- P to pick a photo worth keeping
- X to reject a miss: soft focus, closed eyes, a test shot
- U to clear a flag if you change your mind
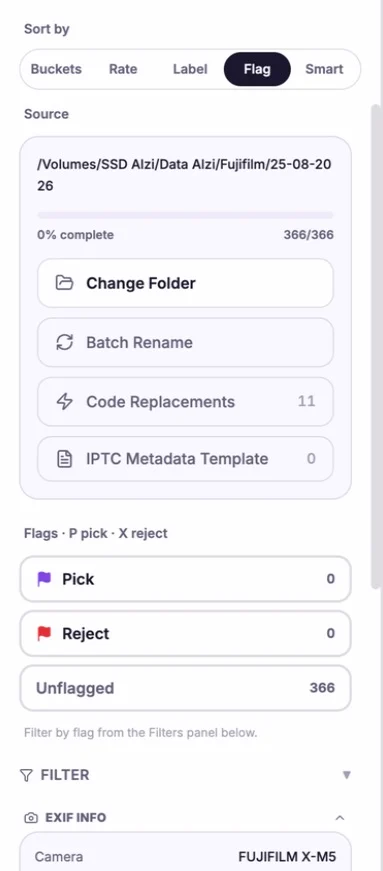
⚡ Turn on Auto-Advance in the top bar. After every P or X, SnapCuller jumps to the next photo for you. Aim for about two seconds per frame. On this pass, speed matters more than precision.
Shot a lot of bursts? Collapse them first with burst stacking, so you can reject a whole failed sequence with one X. There is more on picking and rejecting in the flag keys guide.
step 3
Second pass: rate and label your picks
Now filter down to your picks and add the information you want inside Lightroom. Switch Sort by to Rate and use the rating shortcuts:
- ⌥ Option + 1–5 sets 1 to 5 stars (Alt on Windows), and ⌥ + 0 clears it
- ⌥ Option + 6–9 sets the Red, Yellow, Green or Blue color label
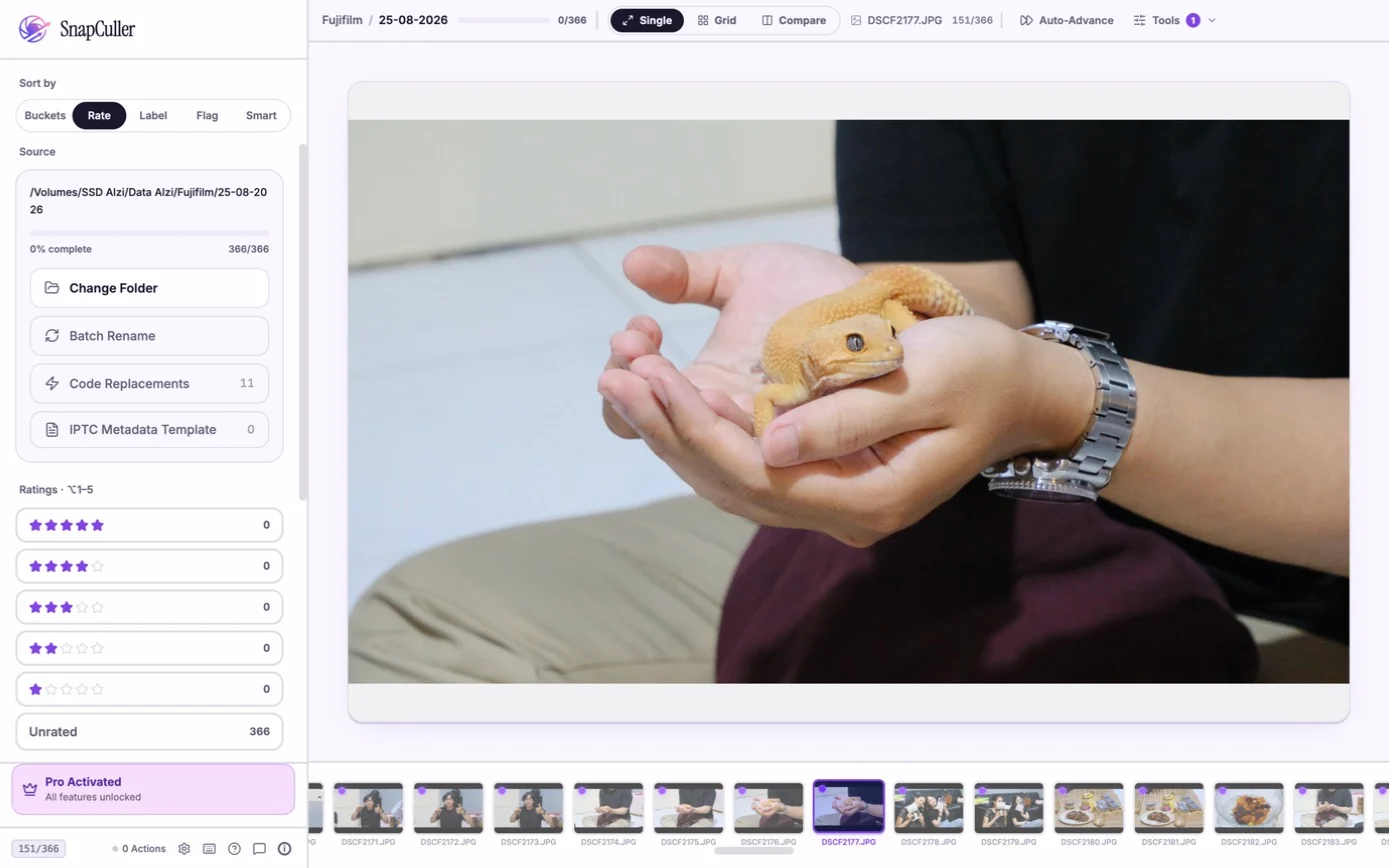
A tiering that maps well onto a Lightroom edit:
- 5 stars: hero shots, edit these first
- 4 stars: strong selects for the gallery
- 3 stars: keep as backups or coverage
- Color labels: by scene or by deliverable, for example Red for ceremony and Green for reception, or Blue for the client's album picks
Every rating and label is written to the photo's XMP sidecar the moment you press the key. There is no "save" or "export metadata" step to forget. The star ratings and color labels guide covers more tiering systems.
step 4
Filter down to the keepers
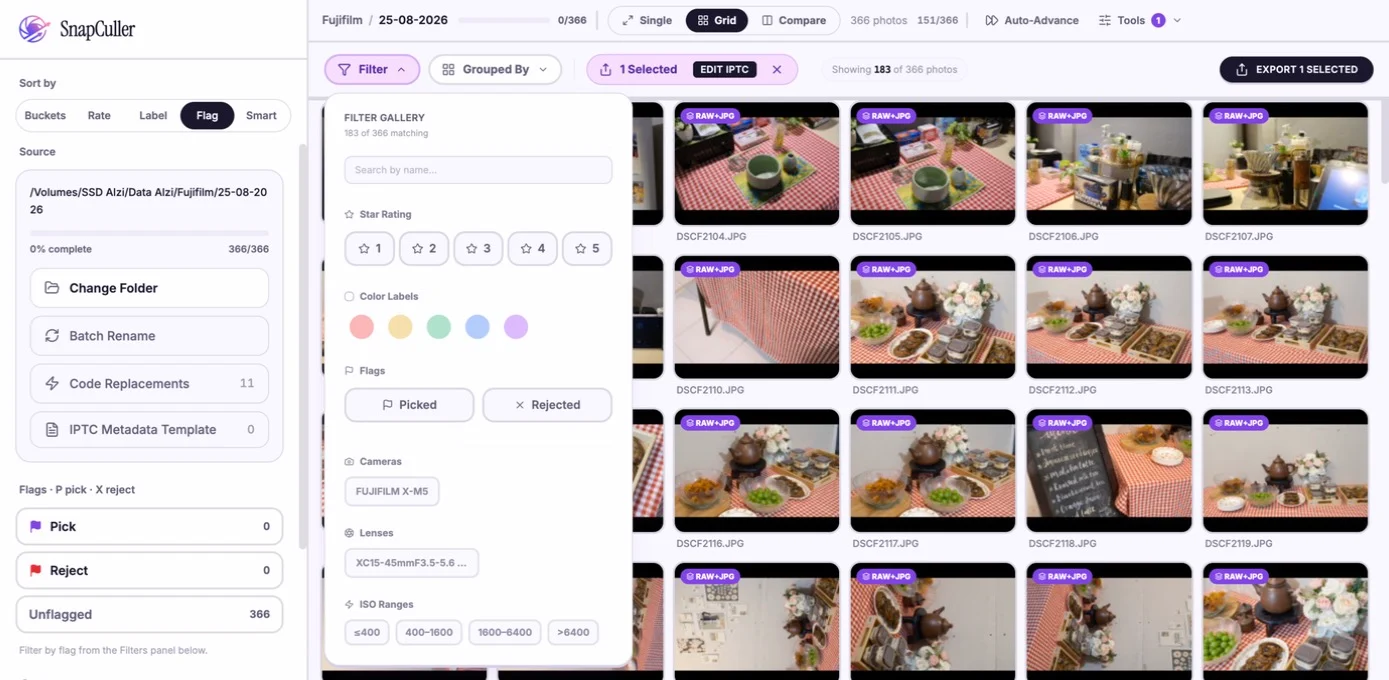
Press G for Grid View and open Filter. Under Flags choose Picked, and optionally add a minimum Star Rating too. The grid now shows exactly the set you want in Lightroom. The header tells you how many photos match.
step 5
Send only the RAW keepers to an import folder
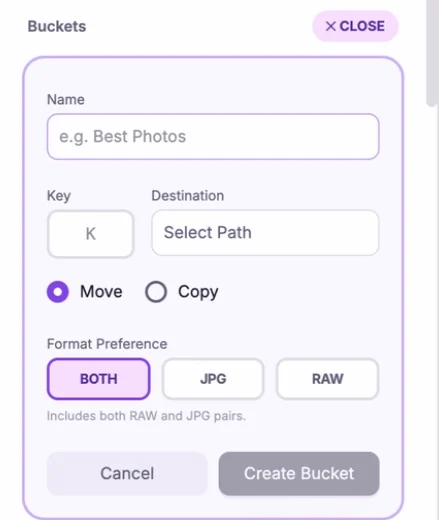
Here is where you separate the keepers from everything else. Create a bucket: a destination folder bound to a single key.
- Switch Sort by to Buckets and click + New.
- Name it something like Lightroom Import, give it a key (for example 1), and choose a destination folder.
- Pick Move to leave only the rejects behind, or Copy to keep the original folder untouched.
- Under Format Preference, choose RAW if you only edit RAW files in Lightroom, or Both to keep the JPEGs with them.
Back in the filtered grid, click the first photo, Shift-click the last one to select the whole range, and press your bucket key. SnapCuller moves (or copies) every selected photo and takes each photo's XMP sidecar with it, so the ratings travel too. If you prefer, the bucket workflow guide shows how to sort straight into buckets during the first pass instead.
step 6
Import the keepers into Lightroom Classic
- In Lightroom Classic, open File → Import Photos and Video.
- Choose the bucket folder as the source from the Files section of the Source panel. Don't use the Devices section, which doesn't pick up XMP sidecars.
- Choose Add to keep the files where they are, or Copy / Move to put them into your usual library structure.
- Check that no metadata preset under Apply During Import overwrites ratings or labels, then click Import.
When the import finishes, filter the Library by rating. Your 5-star heroes are already marked, and you can go straight to the Develop module.
🔁 Already imported the shoot? Cull in SnapCuller anyway, then in Lightroom select the photos and choose Metadata → Read Metadata from File to pull in the new ratings and labels. Do this before you start editing, because it replaces the catalog's metadata with the sidecar's.
why it's faster
Where the time actually goes
SnapCuller shows the JPEG that's already in the RAW file, or the matching JPEG from your RAW+JPEG pair. You never wait for 1:1 previews of frames you are about to reject.
Flags, stars, labels and buckets are all single keystrokes, and Auto-Advance removes the arrow key in between. A gamepad works too.
Lightroom only ever sees the keepers. Fewer files means faster imports, faster searches and a catalog that doesn't fill up with rejects.
Everything runs locally on your machine. No uploads and no subscription per photo, so a 3,000-frame wedding costs nothing extra to cull.
faq
Frequently asked questions
Can Lightroom Classic cull photos before import?
Not really. The Import dialog shows small thumbnails you can check or uncheck, but there is no rating, flagging or full-size review before the files land in your catalog. That is why most photographers cull in a dedicated app first and import only the keepers.
Do SnapCuller star ratings show up in Lightroom?
Yes, for RAW files. SnapCuller writes each rating to an XMP sidecar next to the RAW (for example DSCF2330.xmp next to DSCF2330.RAF), and Lightroom Classic reads star ratings and color labels from that sidecar when it imports the file.
Do Pick and Reject flags transfer to Lightroom?
Don't count on it. Lightroom keeps Pick and Reject flags in its catalog rather than in XMP, so flags set in another app generally don't arrive as Lightroom flags. Use flags to decide what gets imported, and use star ratings or color labels for anything you want to see inside Lightroom.
Why are my ratings missing on JPEG files in Lightroom?
Lightroom Classic ignores XMP sidecars for JPEGs; it expects metadata embedded inside the JPEG itself. If you shoot RAW+JPEG, import the RAW files, which is where the sidecar ratings are read.
My photos are already in Lightroom. How do I pull in the new ratings?
Select the photos in the Library module and choose Metadata → Read Metadata from File. Do this before you make any edits in Lightroom, because it replaces the catalog's metadata with what is in the sidecar.
summary
The workflow on one page
- Copy the card, open the folder in SnapCuller.
- First pass: P / X with Auto-Advance on.
- Second pass: stars and color labels on your picks.
- Filter to Picked (plus a minimum rating).
- Send the keepers to a RAW bucket. The XMP sidecars go with them.
- Import that folder into Lightroom from the Files section.
Lightroom stays the place where you edit, and the keep-or-reject decisions happen before it ever sees a file.